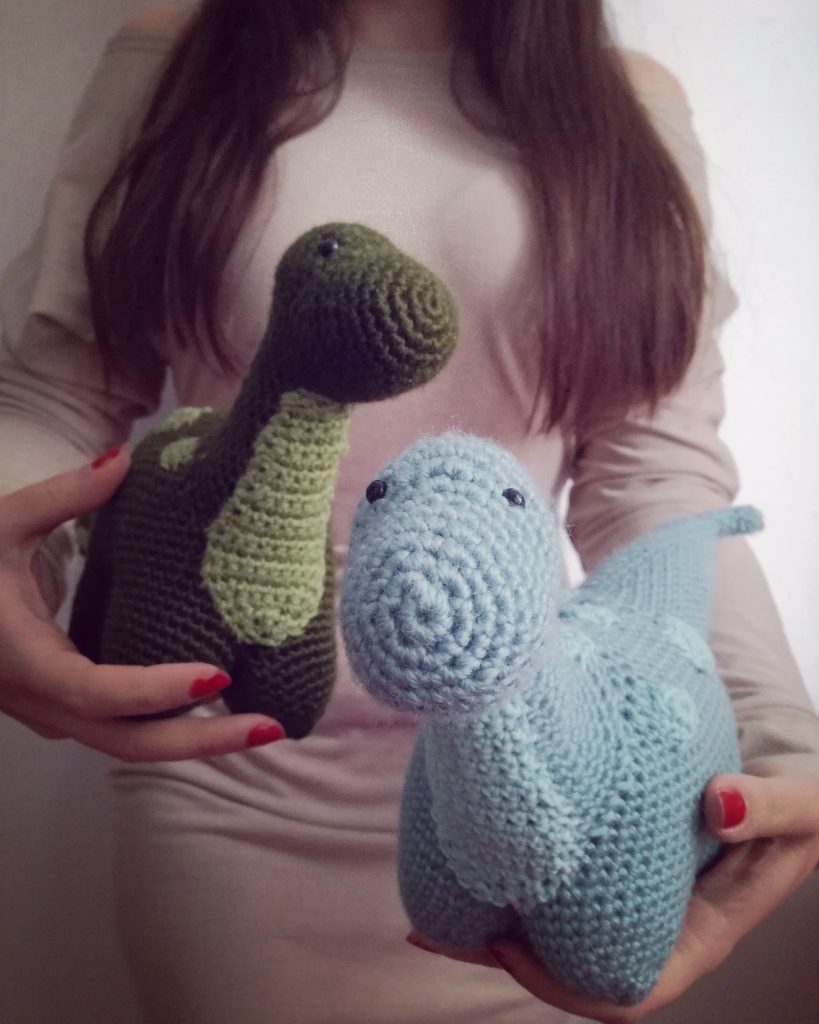
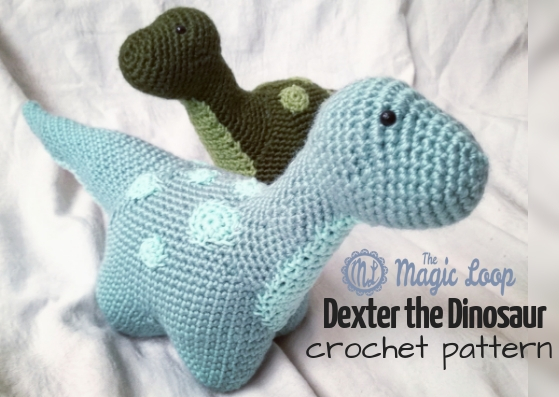
This crochet dinosaur is an updated version of my first amigurumi pattern Dexter the Dinosaur, everything looks the same but in this version the body is worked from the legs up. In addition, this is more beginner-friendly pattern. However, if you like the original version better – you can find it here.
In addition, there is also a new picture-tutorial on how to sew all the parts together – here.
You can also hook this free crochet dinosaur amigurumi pattern on Ravelry here! After that, check out many other Dexters in the Projects section.
Dexter stands 6,7 inches (17cm) tall, and he is 13 inches (33cm) long. In short, if you want to make him, here is what you need:
- crochet hook 4mm/US G
- 2 yarns in contrasting colors(Aran weight) – I used Red Heart Soft Classic for the main color, and Red Heart Niki for the light parts
- 2 safety eyes (6mm)
- stuffing
- tapestry needle
This pattern also uses US terminology and these abbreviations:
- sc – single crochet
- ch – chain
- sc2inc – two single crochets in one stitch (single crochet increase)
- sc2tog – single crochet two stitches together (single crochet decrease)
- slst – slip stitch
- ML – magic loop/ring/circle
Let’s start!
The Legs
- sc6 in ML (6)
- sc2inc x 6 (12)
- (sc, sc2inc) x 6 (18)
- sc18 around (18)
- (sc2, sc2inc) x 6 (24)
- sc24 around (24)
- (sc3, sc2inc) x 6 (30)
- sc30 around (30)
- (sc2inc, sc14) x 2 (32)
- sc32 around (32) – fasten off and make three more.
The Body
I used different color yarn just to show the next step more clearly. IMPORTANT: Before you start with the body, cut about 4 ft of yarn which will be used later for sewing the inside of the legs together. Firstly, join the yarn to the first leg and do 16 single crochet stitches. Secondly, hold the second leg next to the first one and just continue doing 16 sc stitches on that leg. After that, do the same with third and fourth leg. Now you have a line of legs, 16 stitches on each leg, 64 stitches total.
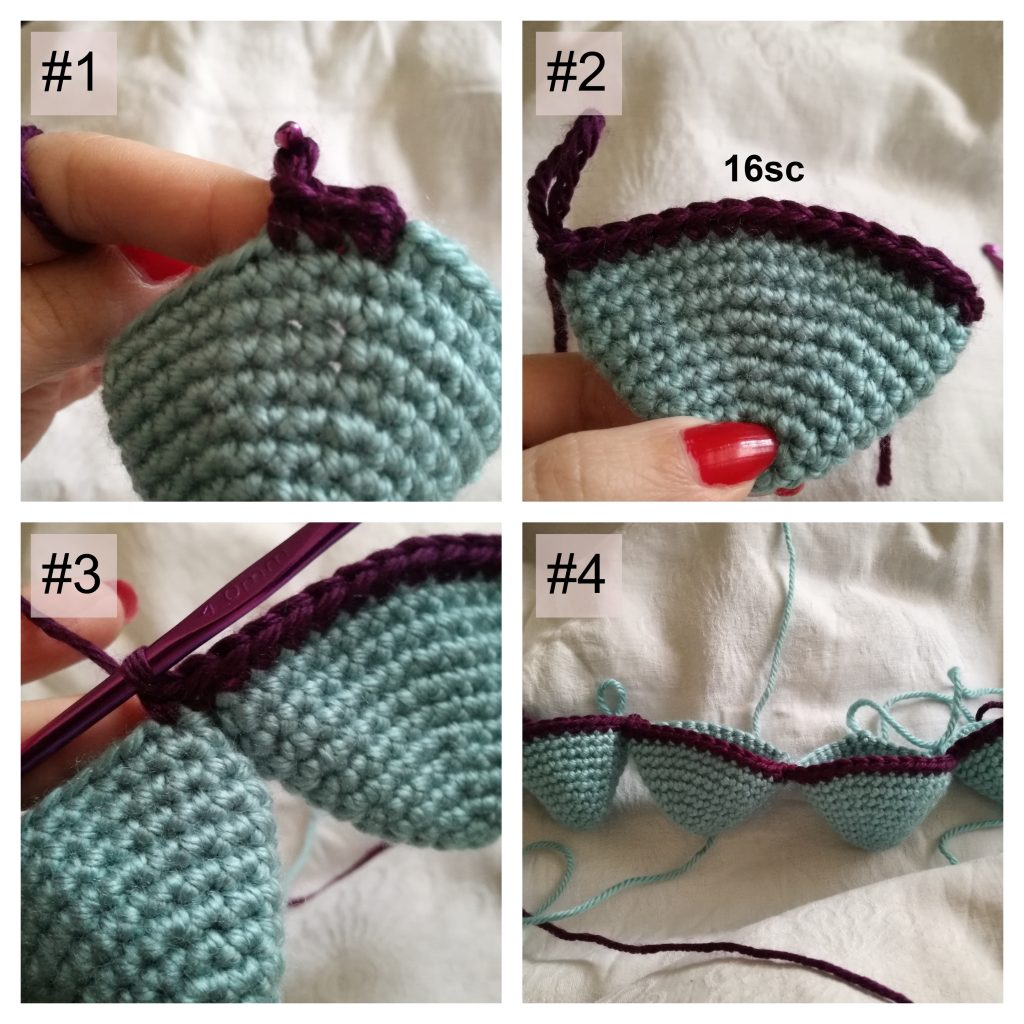
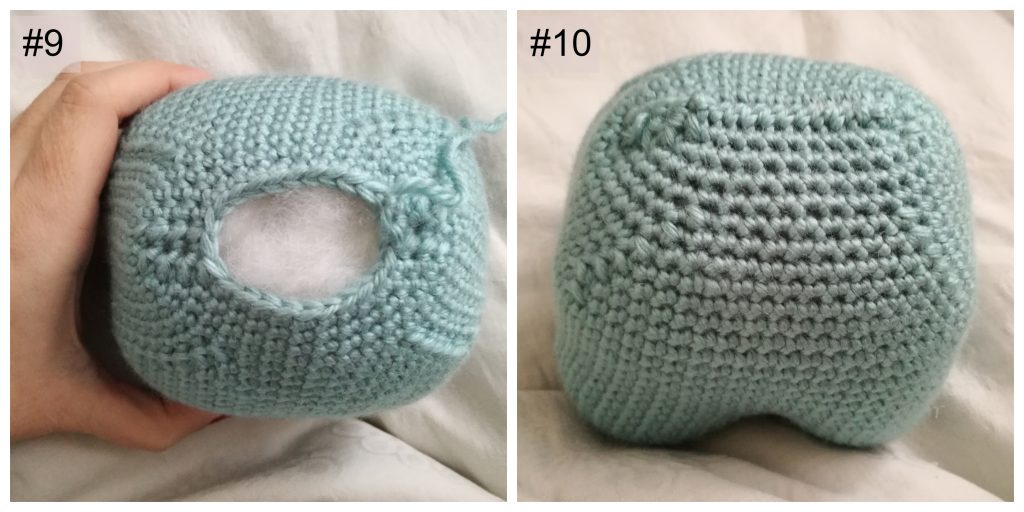
Connect the first and the last leg as shown on the pictures #5 and #6 below.
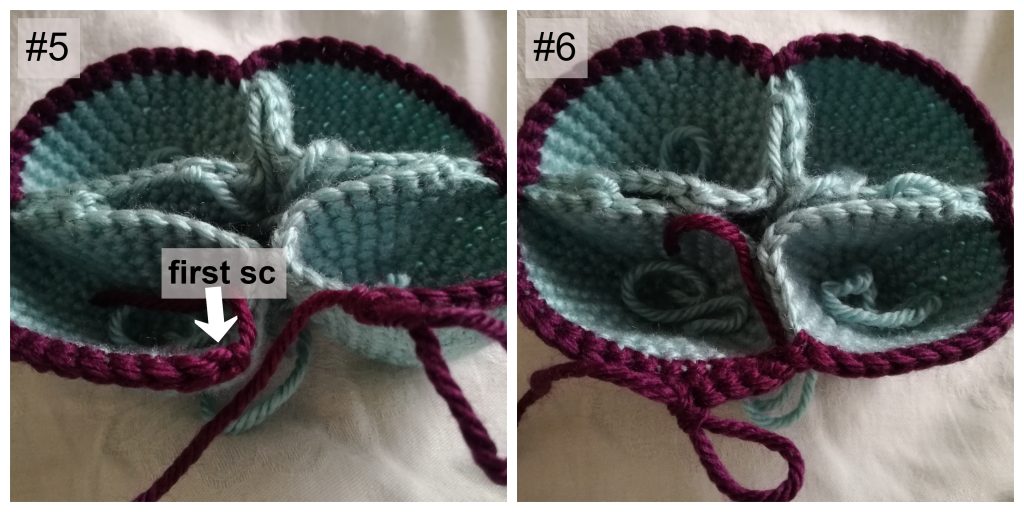
1.(Start from the first sc stitch) sc16, sc2inc, sc31, sc2inc, sc15 (66)
2. – 9. sc66 around (66)
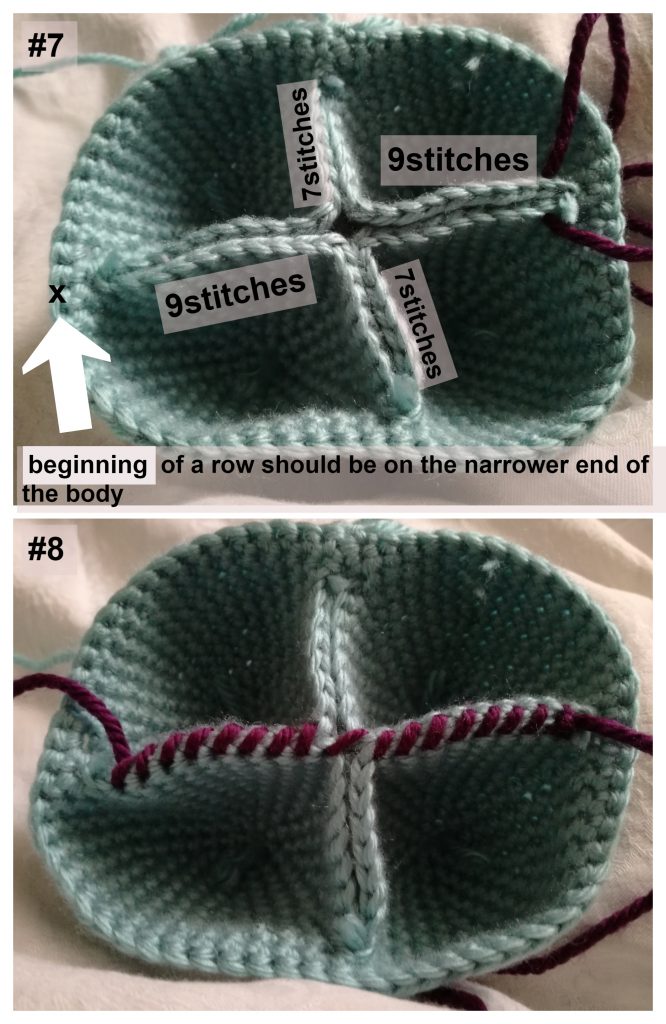
Sew the legs together as shown on the photos #7 and #8 above.
Do 6sc stitches to move your starting point to the middle of the leg and continue:
10. sc2dec, sc19, sc2dec, sc10, sc2dec, sc19, sc2dec, sc10 (62)
11. sc2dec, sc17, sc2dec, sc10, sc2dec, sc17, sc2dec, sc10 (58)
12. sc2dec, sc15, sc2dec, sc10, sc2dec, sc15, sc2dec, sc10 (54)
13. sc2dec, sc13, sc2dec, sc10, sc2dec, sc13, sc2dec, sc10 (50)
14. sc2dec, sc11, sc2dec, sc10, sc2dec, sc11, sc2dec, sc10 (46)
15. sc2dec, sc9, sc2dec, sc10, sc2dec, sc9, sc2dec, sc10 (42)
16. sc2dec, sc7, sc2dec, sc10, sc2dec, sc7, sc2dec, sc10 (38)
17. sc12, sc2dec x 2, sc15, sc2dec x 2, sc3 (34)
18. sc11, sc2dec x 2, sc13, sc2dec x 2, sc2 (30)
19. sc10, sc2dec x 2, sc11, sc2dec x 2, sc1 (26)
20. sc9, sc2dec x 2, sc9, sc2dec x 2 (22) – lastly, stuff the body with a lot of stuffing and sew it shut.
The Tail
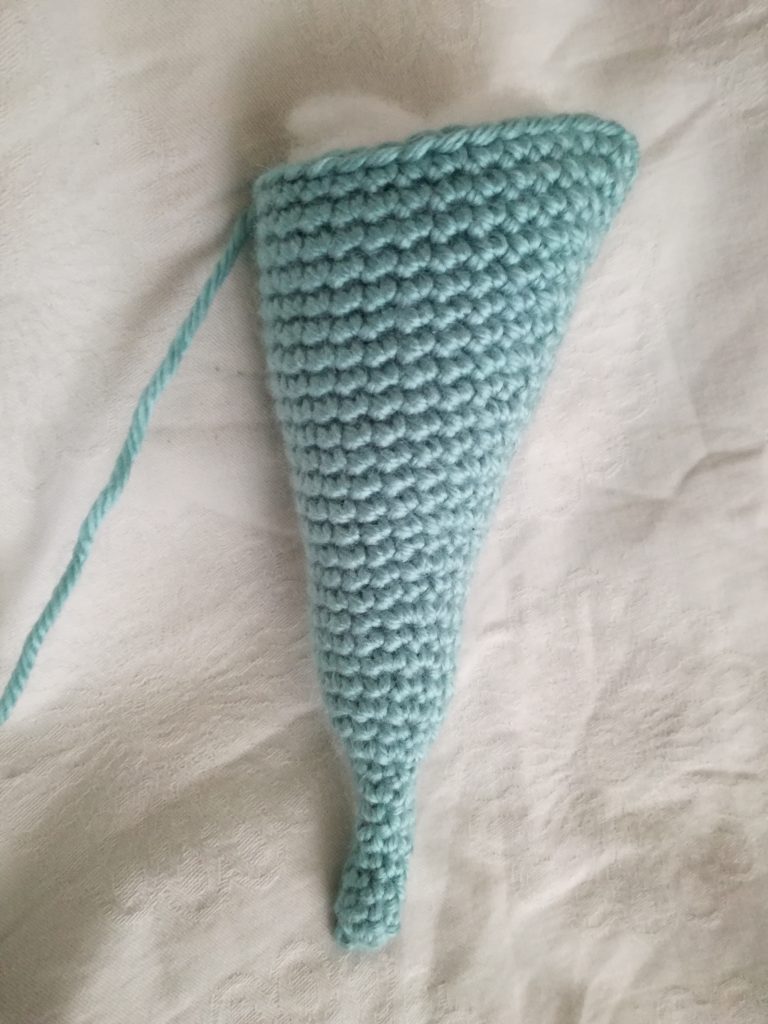
1.sc6 in MR (6)
2. – 5. sc6 (6)
6. sc2inc, sc5 (7)
7. sc 7 around (7)
8. (sc2inc) x 2, sc5 (9)
9. sc9 around (9)
10. sc, (sc2inc) x2, sc6 (11)
11. sc11 around (11)
12. sc2, (sc2inc) x2, sc7 (13)
13. sc13 around (13)
14. sc3, (sc2inc) x2, sc8 (15)
15. sc15 around (15)
16. sc4, (sc2inc) x2, sc9 (17)
17. sc17 around (17)
18. sc5, (sc2inc) x2, sc10 (19)
19. sc19 around (19)
20. sc6, (sc2inc) x2, sc11 (21)
21. sc21 around (21)
22. sc7, (sc2inc) x2, sc12 (23)
23. sc23 around (23)
24. sc8, (sc2inc) x2, sc13 (25)
25. sc25 around (25)
26. sc9, (sc2inc) x2, sc14 (27)
27. sc27 around (27)
28. sc10, (sc2inc) x2, sc15 (29)
29. sc29 around (29)
30. sc11, (sc2inc) x2, sc16 (31)
31. sc31 around (31)
32. sc12, (sc2inc) x2, sc17 (33)
33. sc33 around (33) – fasten off and leave a long tail for sewing.
The Head
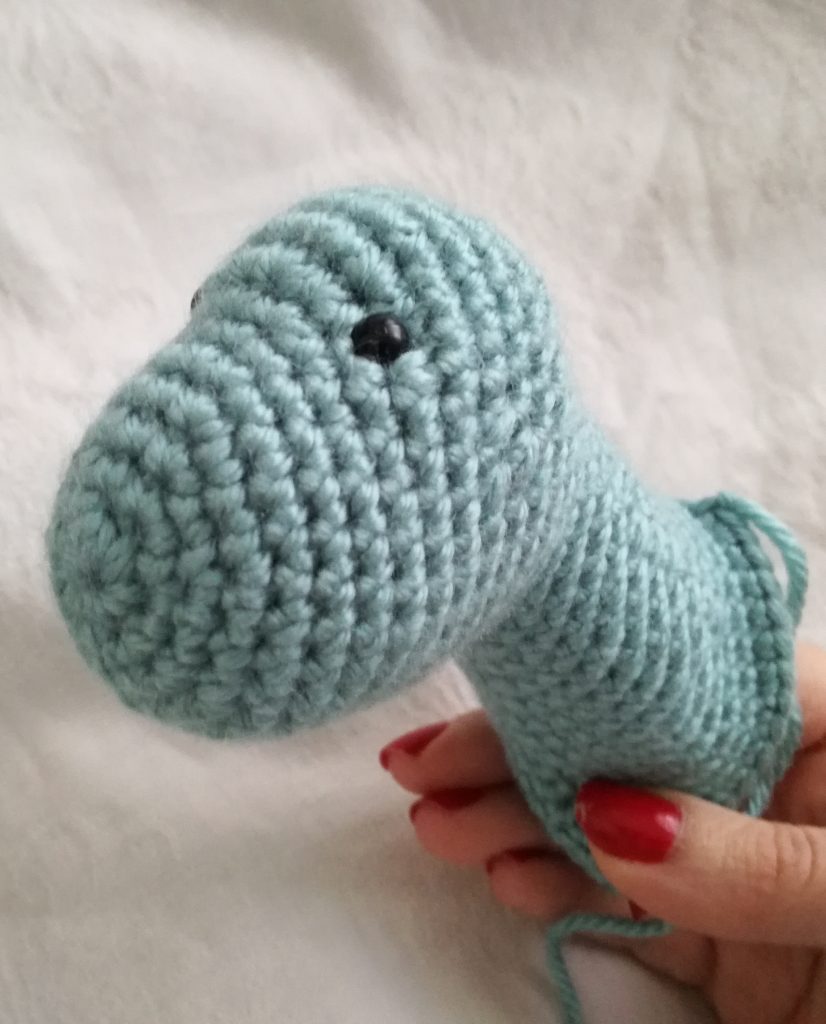
- sc6 in MR (6)
- sc2inc x 6 (12)
- (sc, sc2inc) x 6 (18)
- (sc2, sc2inc) x 6 (24)
- sc24 around (24)
- sc 24 (24)
- sc24 (24)
- (sc2inc) x 4, sc20 (28)
- sc2, (sc2inc) x4, sc22 (32)
- (sc2inc) x 2, sc8, (sc2inc) x 2, sc 20 (36)
- sc16, (sc2tog) x 2, sc12, (sc2tog) x 2 (32)
- sc16, sc2tog, sc12, sc2tog (30)
- sc30 (30)
- sc30 (30)
- sc2, sc2tog, (sc3, sc2tog) x 2, sc8, (sc2inc) x 3, sc5 (30)
- sc2, sc2tog, (sc2, sc2tog) x 2, sc8, (sc2inc) x 3, sc7犀利士 (30)
- (sc, sc2tog) x 3, sc9, (sc2inc) x 3, sc9 (30)
- sc, (sc2tog) x 3, sc10, (sc2inc) x 3, sc10 (30)
- sc2, sc2tog, sc3, sc2tog, (sc4, sc2inc) x 3, sc3, sc2tog, sc (30)
- sc, sc2tog, sc3, sc2tog, (sc4, sc2inc) x 3, sc3, sc2tog, sc2 (30)
- repeat row 20. (30)
- repeat row 20. (30)
- sc2tog, sc3, sc2tog, (sc4, sc2inc) x 3, sc3, sc2tog, sc3 (30)
- repeat row 23. (30)
- repeat row 23. (30)
- sc30 (30)
- sc30 (30)
- (sc4, sc2inc) x 6 (36)
Note: Insert the safety eyes between rows 9 and 10, and 9 stitches apart.
The light parts
Front:
1.ch4 (4)
2. in 2nd chain from hook sc, sc2, *ch, TURN* (after every row chain and turn your work) (3)
3. sc, sc2inc, sc, (4)
4. – 5. sc4, (4)
6. sc, sc2inc x 2, sc (6)
7. – 10. sc6 (6)
11. sc, sc2inc, sc2, sc2inc, sc (8)
12. – 14. sc8 (8)
15. sc, sc2inc, sc4, sc2inc, sc (10)
16. – 18. sc10 (10)
19. sc1, sc2tog, sc4, sc2tog, sc (8)
20. sc1, sc2tog, sc2, sc2tog, sc (6)
21. sc, sc2tog x 2, sc (4)
22. sc2tog x 2 (2) – fasten off and leave a long tail for sewing.
Back:
1.ch4 (4)
2. in 2nd chain from hook sc, sc2, *ch, TURN* (after every row chain and turn your work) (3)
3. sc3 (3)
4. sc,sc2inc, sc (4)
5. – 7. sc4 (4)
8. sc, sc2inc x 2, sc (6)
9. – 11. sc6 (6)
12. sc, sc2inc, sc2, sc2inc, sc (8)
13. – 15. sc8 (8)
16. sc, sc2inc, sc4, sc2inc, sc (10)
17. – 19. sc10 (10)
20. sc, sc2tog, sc4, sc2tog, sc (8)
21. sc, sc2tog, sc2, sc2tog, sc (6)
22. sc, sc2tog x 2, sc (4)
23. sc2tog x 2 (2) – fasten off and leave a long tail for sewing.
Dots:
You can make as many as you like in different sizes. I made two big ones by sc6 in ML and than sc2inc in all 6 stitches. Two by sc9 in ML, and four little ones by sc6 in ML. Certainly, you can make your crochet dinosaur without dots. However you prefer.

Lastly, for picture tutorial on how to stuff and sew all the parts of this crochet dinosaur together click here.
Certainly, if you have any questions or comments, feel free to contact me in comments section of this post, on my Facebook page, and by e-mail themagicloop.com@gmail.com. Also, if you make Dexter, send me some pictures, I’ll publish them on my Facebook page. On the other hand, you can tag me on your Instagram or Facebook post so I can share those.
Most importantly, have fun making your crochet dinosaur.
In addition, you can support me by sharing this post or by buying my other patterns on Etsy or Ravelry.
This pattern is copyright of Barbara Peček / TheMagicLoop.com . Please do not claim this pattern as your own. If you wish to share this pattern, you may link to this pattern but please do not reprint it on your site. Do not sell this pattern or parts of this pattern. Lastly, you may sell finished items made from this pattern, but please clearly credit the design to me and provide a link to my blog www.themagicloop.com.




24 Comments
Hi there, I finished one Dexter and decided to make a second Dexter. While making Dexter #2 I noticed the body ended up a lot bigger.
To my surprise, I had not done row 2 through 9 on the body of Dexter #1. Funny thing is, when I see the pics of your Dexter, it seems you also skipped row 2-9 on the body.
Without these 8 single crochet rows I would have just that decreasing part of the body, right? 🙂 it would be much smaller.
Indeed. Without the 8 rows I ended up with a smaller one. It is the same size as the one shown in the pictures on this page.
I made my second Dexter with the 8 rows and only the next morning I figured out why Dexter 2 was so much bigger than Dexter 1, but I blame that on me being blond. 🙂
I made the two Dexters for the two grandsons of my two sisters (2 years old and 3 years old) and they loved them as soon as they saw them. I don’t have a smartphone so I can’t post any pictures, but I thank you very much for this pattern. It was really fun to make them.
Cheers!
I’m so glad you and your grandsons liked it 🙂
Oh my gosh. I just realized I did the same thing! Whoops. How did the tail/head fit onto the smaller body? I haven’t attached the body parts together so I could still rework the body…
Love this pattern! Made one for my 7 month old boy and plan to do one in pink/purple for my 3 year old girl. Thanks so much!
My Dino seems to be coming out a little wonky! Are these rows joined in the round, or done as a spiral?? Thanks!
as a spiral, no slip-stitches 🙂
I’ve made a few of these dinos as gifts already! (Currently working 2 more as Christmas gifts for a niece a d nephew).
I’ve noticed in making them that rows 19 and 20 of the body are a little off from the stitch count in the pattern. Should it be correct as follows?
19. sc10, sc2dec x 2, sc11, sc2dec x 2, sc1 (26)
20. sc9, sc2dec x 2, sc9, sc2dec x 2 (22)
Anywho, thanks a ton for this pattern! It’s been well-loved!
I just finished and omg. I love how he came out. I didn’t use safety eyes on mine. I have dragon eyes that I glued on. Mine was red with yellow spots and yellow dragon eyes with red speckled.
I just finished the legs and am wondering if it would make a difference if I sc the top of the legs together rather than sewing them? Wonderful pattern btw! My grandson is so excited 🙂
never commented on a free pattern before but this deserves a huge well done ! excellent, well written instructions! about to start my second one, love it !
fantastic pattern ! so easy to follow , thank you
I have a question about row 10 of the body: The pattern says first to do 6 sc to get to the middle of the next leg, but the middle would be 8 stitches in otherwise the head and tail would be crooked. Is that part of the design or a typo?
Thanks!
hi Marlene, it’s not a typo, the pattern is correct, but maybe your stitches are a bit tighter than mine…
I’m actually obsessed with Dexter he’s so fun to make and works up so quickly I think I’ve made 5 in three weeks as gifts and everybody has been completely enamoured with him!
I absolutely loved doing this pattern! Very well written and explained perfectly. My Grandson loves it. I have pictures, but don’t know how to add them. I did send you a message on Messenger with pictures.
I am working on Dexter and have got to Line 15 on the head and was a little confused. 15-27 have the same end count(30) but done in different configurations.
I am kind of doubting, wondering if that is correct does it change the head with out changing the count, I am sorry if it is a unnecessary question, Thanks so much> I am excited to give this as a birthday gift for a two year old.
I had this same confusion at first but it is correct and works out! you reduce the top part to round out the head while increasing the neck so it extends. the count stays the same so it just shifts down the neck. hard to explain in words but if you follow it exactly as written it’ll make sense once you see it come together!!
I’ve just made Dexter – not sure how but it’s considerably bigger than yours!! Looks great though, thanks!
Thank you so much for publishing this pattern. My 2 year old granddaughter is dinosaur made and at last I’ve found your pattern and I can actually follow the instructions for it without getting too confused. I’m hoping to finish it in time for Christmas (only a week away) and have decided to use chunky with a size 5 hook as I couldn’t get the shades I wanted in aran at my local yarn shop.
The dinosaur is adorable! I used both patterns separately for two dinosaurs. I combined the patterns for my third dinosaur by attaching the body from the original pattern to the legs of the new pattern.