Hook this free dinosaur amigurumi pattern on Ravelry here!
UPDATE: There is a new version of this pattern. The body is worked from the legs up, everything else is the same. Updated version is right HERE.
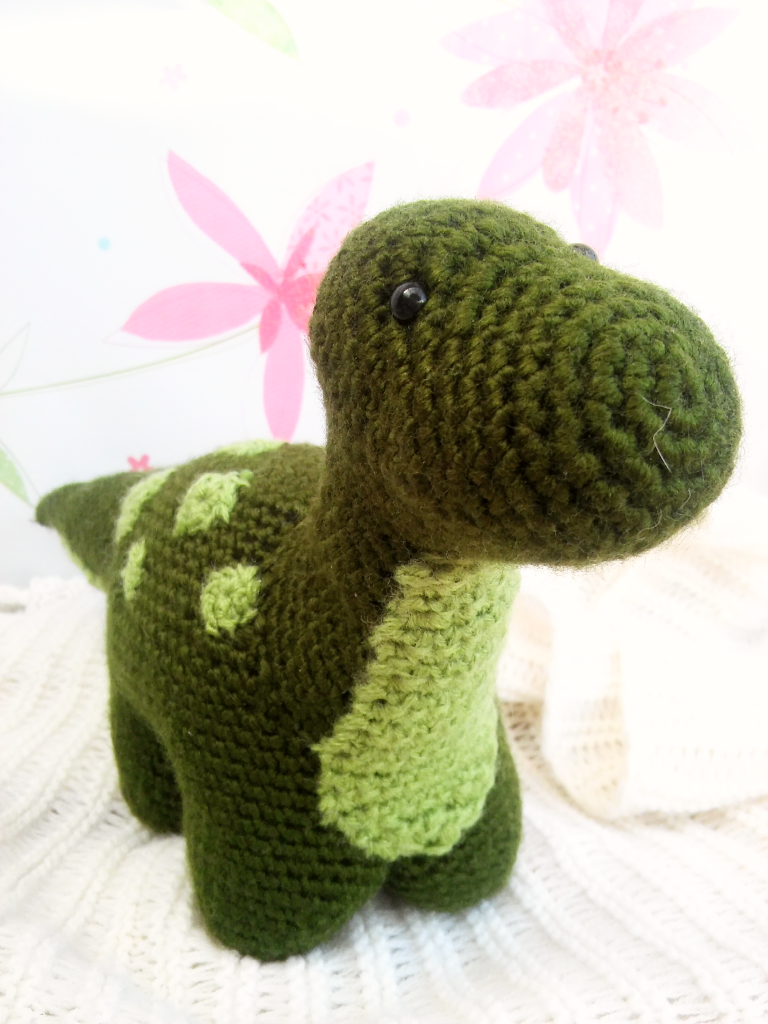
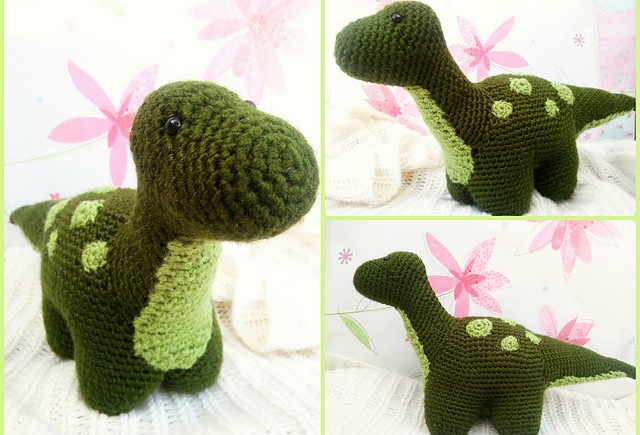
Meet Dexter, my little green dinosaur. He stands 6,7 inches (17cm) tall, and he is 13 inches (33cm) long. If you want to make him, here is what you need:
- crochet hook 4mm/US G
- 2 yarns in contrasting colors(Aran weight)
- 2 safety eyes (6mm)
- stuffing
- tapestry needle
This pattern uses US terminology and these abbreviations:
- sc – single crochet
- ch – chain
- sc2inc – two single crochets in one stitch (single crochet increase)
- sc2tog – single crochet two stitches together (single crochet decrease)
- slst – slip stitch
Let’s start!
The Body – work from the top, oval shape
- ch11 (11)
- in 2nd chain from hook sc2inc, sc8, in last ch sc3inc, sc8, sc1 in first chain where you made sc2inc so there is 3 single crochet on both ends of the oval and 8 single crochets on each side. (22)
- in next stitch (top stitch) sc3inc, sc 10, sc3inc, sc 10 (26)
- sc, sc3inc, sc12, sc3inc, sc 11 (30)
- sc2, sc3inc, sc14, sc3inc, sc12 (34)
- sc3, sc3inc, sc16, sc3inc, sc13 (38)
- sc2inc, sc7, sc2inc, sc10, sc2inc, sc7, sc2inc, sc10 (42)
- sc2inc, sc9, sc2inc, sc10, sc2inc, sc9, sc2inc, sc10 (46)
- sc2inc, sc11, sc2inc, sc10, sc2inc, sc11, sc2inc, sc10 (50)
- sc2inc, sc13, sc2inc, sc10, sc2inc, sc13, sc2inc, sc10 (54)
- sc2inc, sc15, sc2inc, sc10, sc2inc, sc15, sc2inc, sc10 (58)
- sc2inc, sc17, sc2inc, sc10, sc2inc, sc17, sc2inc, sc10 (62)
- sc2inc, sc19, sc2inc, sc10, sc2inc, sc19, sc2inc, sc10 (66)
- – 21. sc66 around (66) Don’t break the yarn!
The Legs – continue from the previous round
- sc 12, (now your hook should be right on the middle of the front side of the body, if not, add or remove some stitches), ch16, attach your chain onto the body (from the outside) by counting back 4 stitches from the starting point of the row 22. You should now have circle of 16 stitches of the body, and 16 chains on the inside of the body. (32)
- sc15, sc16 (sc in every chain) (32)
- sc32 around (32)
- sc22, sc2tog, sc2tog, sc6 (30)
- sc30 around (30)
- (sc3, sc2tog) x 6 (24)
- sc24 around (24)
- (sc2, sc2tog) x 6 (18)
- sc18 around (18)
- (sc, sc2tog) x 6 (12)
- sc2tog x 6 (6)
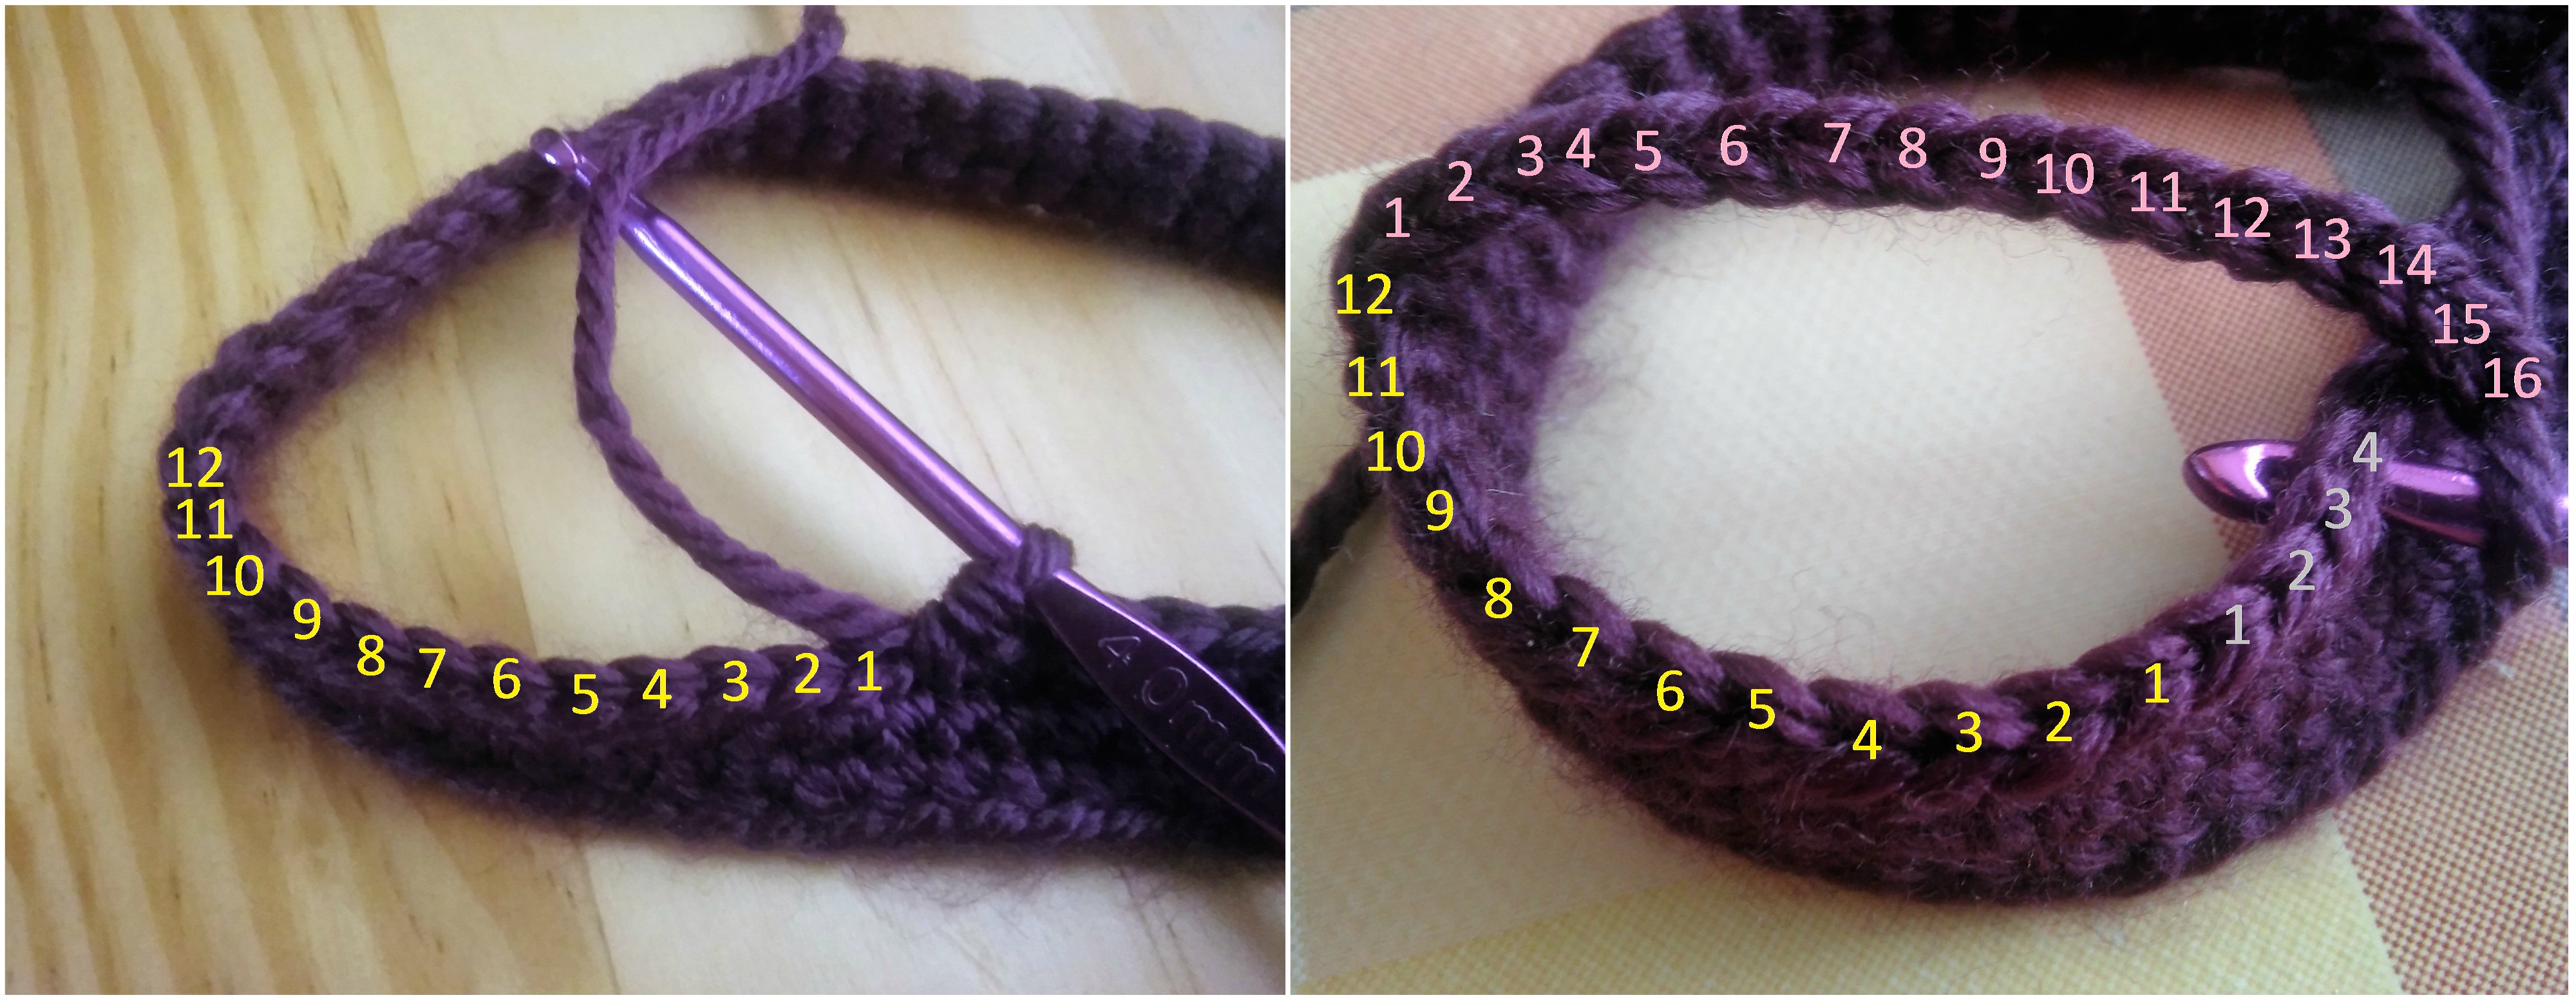
Yellow numbers show the first sc12, pink are ch16, and gray are the 4 stitches from the start you use to get 16 stitches on the body. Make sure to insert your hook from the outside to attach your chain to the body by making single crochet in 4th stitch from the start. Your chain should be straight, not twisted in any way.

Continue making 15sc on the body (+1 you made by attaching your chain =16). Sc16 on the chain, work those stitches from the outside. Third picture shows you how it should look like after you made 2nd row of the leg.
Make other front leg the same way you made first one starting from the next stitch, right after the stitch where you started your ch16. Make back legs the same way, just leave one stitch place between front and back legs.
Make other front leg the same way you made first one starting from the next stitch, right after the stitch where you started your ch16. Make back legs the same way, just leave one stitch place between front and back legs.
Here comes the tricky part, now you have to sew legs together. Start by sewing front legs together. cut the yarn and sew back legs together. Stuff the toy and close it up. Here is the picture of the bottom side.

The Tail – work in the round
- sc6 in MR (6)
- sc6 (6)
- sc6 (6)
- sc6 (6)
- sc6 (6)
- sc2inc, sc5 (7)
- sc 7 around (7)
- (sc2inc) x 2, sc5 (9)
- sc9 around (9)
- sc, (sc2inc) x2, sc6 (11)
- sc11 around (11)
- sc2, (sc2inc) x2, sc7 (13)
- sc13 around (13)
- sc3, (sc2inc) x2, sc8 (15)
- sc15 around (15)
- sc4, (sc2inc) x2, sc9 (17)
- sc17 around (17)
- sc5, (sc2inc) x2, sc10 (19)
- sc19 around (19)
- sc6, (sc2inc) x2, sc11 (21)
- sc21 around (21)
- sc7, (sc2inc) x2, sc12 (23)
- sc23 around (23)
- sc8, (sc2inc) x2, sc13 (25)
- sc25 around (25)
- sc9, (sc2inc) x2, sc14 (27)
- sc27 around (27)
- sc10, (sc2inc) x2, sc15 (29)
- sc29 around (29)
- sc11, (sc2inc) x2, sc16 (31)
- sc31 around (31)
- sc12, (sc2inc) x2, sc17 (33)
- sc33 around (33)
The Head
- sc6 in MR (6)
- sc2inc x 6 (12)
- (sc, sc2inc) x 6 (18)
- (sc2, sc2inc) x 6 (24)
- sc24 (24)
- sc24 (24)
- sc24 (24)
- (sc2inc) x 4, sc20 (28)
- sc2, (sc2inc) x4, sc22 (32)
- (sc2inc) x 2, sc8, (sc2inc) x 2, sc 20 (36)
- sc16, (sc2tog) x 2, sc12, (sc2tog) x 2 (32)
- sc16, sc2tog, sc12, sc2tog (30)
- sc30 (30)
- sc30 (30)
- sc2, sc2tog, (sc3, sc2tog) x 2, sc8, (sc2inc) x 3, sc5 (30)
- sc2, sc2tog, (sc2, sc2tog) x 2, sc8, (sc2inc) x 3, sc7 (30)
- (sc, sc2tog) x 3, sc9, (sc2inc) x 3, sc9 (30)
- sc, (sc2tog) x 3, sc10, (sc2inc) x 3, sc10 (30)
- sc2, sc2tog, sc3, sc2tog, (sc4, sc2inc) x 3, sc3, sc2tog, sc (30)
- sc, sc2tog, sc3, sc2tog, (sc4, sc2inc) x 3, sc3, sc2tog, sc2 (30)
- repeat row 20. (30)
- repeat row 20. (30)
- sc2tog, sc3, sc2tog, (sc4, sc2inc) x 3, sc3, sc2tog, sc3 (30)
- repeat row 23. (30)
- repeat row 23. (30)
- sc30 (30)
- sc30 (30)
- (sc4, sc2inc) x 6 (36)
The light parts
Front:
- ch4 (4)
- in 2nd chain from hook sc, sc2, *ch, TURN* (after every row chain and turn your work) (3)
- sc, sc2inc, sc, (4)
- sc4, (4)
- sc4, (4)
- sc, sc2inc x 2, sc (6)
- sc6 (6)
- sc6 (6)
- sc6 (6)
- sc6 (6)
- sc, sc2inc, sc2, sc2inc, sc (8)
- sc8 (8)
- sc8 (8)
- sc8 (8)
- sc, sc2inc, sc4, sc2inc, sc (10)
- sc10 (10)
- sc10 (10)
- sc10 (10)
- sc, sc2tog, sc4, sc2tog, sc (8)
- sc, sc2tog, sc2, sc2tog, sc (6)
- sc, sc2tog x 2, sc (4)
- sc2tog x 2 (2)
Back:
- ch4 (4)
- in 2nd chain from hook sc, sc2, *ch, TURN* (after every row chain and turn your work) (3)
- sc3 (3)
- sc,sc2inc, sc (4)
- sc4 (4)
- sc4 (4)
- sc4 (4)
- sc, sc2inc x 2, sc (6)
- sc6 (6)
- sc6 (6)
- sc6 (6)
- sc, sc2inc, sc2, sc2inc, sc (8)
- sc8 (8)
- sc8 (8)
- sc8 (8)
- sc, sc2inc, sc4, sc2inc, sc (10)
- sc10 (10)
- sc10 (10)
- sc10 (10)
- sc, sc2tog, sc4, sc2tog, sc (8)
- sc, sc2tog, sc2, sc2tog, sc (6)
- sc, sc2tog x 2, sc (4)
- sc2tog x 2 (2)
Dots:
You can make as many as you like in different sizes. I made two big ones by sc6 in MR and than sc2inc in all 6 stitches. Two by sc9 in MR, and four little ones by sc6 in MR.

If you have any questions or comments, feel free to contact me in comments section of this post, on my Facebook page, or by e-mail themagicloop.com@gmail.com. Also, if you make Dexter, send me some pictures, I’ll publish them on Pinterest and on my Facebook page.
You can support me by sharing this post or by buying my other patterns on Etsy or Ravelry. 🙂
This pattern is copyright of Barbara Peček / TheMagicLoop.com . Please do not claim this pattern as your own. If you wish to share this pattern, you may link to this pattern but please do not reprint it on your site. Do not sell this pattern or parts of this pattern. You may sell finished items made from this pattern, but please clearly credit the design to me and provide a link to my blog www.themagicloop.com.


66 Comments
I can’t wait to give this a try! I was looking for a good dinosaur pattern ~_^
Awesome! I would love to see some photos when he’s done 😀
I think there’s a mistake in the part of the head, in round 10:
(sc2inc) x 2, sc8, (sc2inc) x 2, sc 24 (36)
The sum of that is 40, not 36, so what should I do?
Option 1: (sc2inc) x 2, sc8, (sc2inc) x 2, sc 10 (36)
Option 2: sc2inc, sc8, sc2inc, sc 24 (36)
Thank you for the pattern though, it’s great!
Hi Michelle.
Thank you so much for your comment. I already got 6 or 7 finished dinosaur photos and yet no one reported that error, so thank you for noticing that. 🙂
So, I checked my original notes and it says:
row 10: (sc2inc) x 2, sc8, (sc2inc) x 2, sc 20
I’ll change the pattern on my website.
If you should find any other error or if you need any help with this pattern, feel free to contact me any time.
Have a great day.
Hi I’m on the head row 1. At the end it says sc5 but after doing all of the stitches I’m left with 2. Also row 12-27 all says that the ending number is 30, is that right?
I meant row 15
Hi Nikole. I’ve sent you a message on the e-mail address you provided.
So, if I understood you correctly, you’ve done all the stitches from row 15, and there is two more stitches left to the end of the row? Did you count how many stitches you have after doing row 15? I think you missed something in the instructions for the row 15. It goes sc2, sc2tog, (sc3, sc2tog) x 2, sc8, (sc2inc) x 3, sc5…
so you have three decreases (making 3 stitches), and three increases (making 6 stitches). That adds up to 30 stitches.
If you have more than 30 stitches before row 15, maybe you missed something in previous rows? Also, rows 12-27 should all have 30 stitches, because those rows make the neck.
Hey sorry to bother you. Row 18 at the end it says inc2 x3 then 10sc but I’ve redone this row twice and I keep coming up with 8sc but when I count my stitches I get 30.
Of course you’re not bothering me. 🙂
If you have 30 stitches after doing the previous row(17) everything should be fine. Row 18 says: sc1, (sc2tog) x 3, sc10, (sc2inc) x 3, sc 10.
So, again you have 3 decreases that gives you 3 stitches, and 3 increases that give you 6 stitches. Those 9 stitches + sc1 + sc10 + sc10 = 30stitches
I see my mistake. Thank you.
Hi, it’s me again… I have a doubt, the other day I was doing the head, but at the end it seemed as if it was all awry ( I don’t know if that’s the word). So I was wondering, do you make a slipstitch at the end of each row?
No, I don’t. Do the slip stitch only when the pattern says so. If you keep your stitches tight, the neck should turn out straight.
Ok, I’ll do that, thank you 🙂
Where it says “sc 12, (now your hook should be right on the middle of the front side of the body, if not, add or remove some stitches)…by counting back 4 stitches from the starting point of the”, I had to add some stitches, so instead of having 12 I have 13. I should count the 4 stitches back from those 13 or the 12 ones?
you should count 3 stitches instead of 4. That makes 16 stitches for the leg.
This is probably a stupid question but what does MR mean in instructions for the tail and head. Thank you
Hi Terri. MR stands for magic ring, often referred as magic circle or magic loop. 🙂
Thank you, I should have figured that out.
May I ask how you sew the head and tail on? Its no where in the instructions.
Here are the instructions:
http://themagicloop.com/index.php/how-to-assemble-and-sew-dexter-the-dinosaur/
Hi I’m just starting your dinasor and I’m at row 6 body the counts don’t match could it be a misprint and the start of round supposed to be 2sc instead of three I noticed all rounds before and after were
Hi Denelda. Thank you for noticing this error. Instead of last sc14 it should be sc13. 🙂
Love this pattern thanks! I’ve been looking for a good dinosaur pattern to make for my son 🙂
Hi, Could you explain the second row of the body?
Hi Elgin.
The body is worked in oval shape. When you do all the stitches in row2 you should have an oval that has three sc on each end(all three should be in one stitch) and 8 stitches on both sides. So, you start by doing sc2inc in 2nd chain from hook, sc in next 8 chains and in the last chain sc3inc. Than you continue working around…sc in 8 chains and sc one more in the first stitch where you did sc2inc, so you have 3 stitches there…
I am still a bit confused, I am so sorry. I have the first half of the second row, but I’m not sure how to take my little line of stitches into an oval. So, right after the 3 sc in the last stitch, where do I put the next 8 stitches?
you have to continue working around, not turning your work. The first sc (of the other 8) should be in the same chain where is the last sc of the first 8 sc.
There are many videos on how to crochet an oval on Youtube… 🙂
I am at the not so bright stage. I am confused on how to start the second leg. Do I start at the left of the previous 12 stitches. If so, how do I go back the 4 stitches. I apologize for the brain dump but frustration has set in. I appreciate your help.
You have to go back 4 stitches for the first leg only. 🙂
I finished the first front leg but I don’t understand how to do the second one. Do we cut the string and continue?
Yes, you should cut the yarn and start the 2nd leg from the next stitch on the body. 🙂
Hi.
Hope I’m not being silly here. But I’m confused with the legs. You say start the 2nd leg in the next stitch, 12 sc and then chain 16 =28 but there should be 32. Do we leave 4 stitch spaces and then 12sc so we can go back 4sc as the same as the 1st leg??
Hi Maxine. You should do 16sc, not 12 🙂
Oops. Sorry. I didn’t see that.
Thank you.
I was thinking I couldn’t do it but now can’t wait to complete it for my son x
Okay so kind of confused, on how to get a oval shape? I looked up how to make an oval on youtube. And they’re all started with magic circles, is that how I should start it, or how does this pattern end up in a oval?
Do I have continue crochet on? Like I’m at the end, where it say sc8 do I just chain 8. I’m really confused
Hi Ali. Here is a good tutorial on how to crochet an oval:
https://www.youtube.com/watch?v=_B9BinO3ULg (Not my video, but it can help)
The only difference is that I do two sc in the 2nd chain from hook, and than just the one in the end, and she does one in the beginning and two in the end.
Hi. Im working on this pattern now, and I’m finding the legs confusing. In order to close the belly, do the insides of the legs get sewn together?
Hi Mary! Yes, they get sewn together. 🙂
How am I supposed to work the last 3 legs? I’m really confused about how to do the legs and then close the belly and when to stuff the body… plus, the beginning 10 rows has caused the top of the oval to create a ridge on top… is that supposed to happen? I’m sorry… I’m just so lost about this part of the project… help please!
Hi Jen!
The last 3 legs are worked exactly the same as the first one. After you make all of them, you sew together the chain part, just remember to stuff the toy before you close it completely. The ridge on top will go away when you stuff the body.
Also, how do I attach the chained part of the legs to the rest of the body? Am I supposed to just sew all of it together?
Thank you for the help! After I make the first leg, do I f/o and reattach for each of the other legs?
that’s right 🙂
Thanks you for this patern!
You can see the results at my blog http://laan50.blogspot.nl/2017/02/dino-haken-gratis-patroon.html
(with link to your site)
Greetz, Di
Thank you for sharing your work with me. You did an amazing job. 🙂
P.S. I like your other work too 😀
i love your dinosaur pattern made three of them and a little one
I’m glad you like it Judy 😀
When making the body when you state the top stitch does that mean that all stitches after this point are in the top stitch? Im not sure my body is looking the way it should,
Hi Maxine,
in the top stitch should go sc3inc, so 3 sc stitches.
I understood that part. Do you only go through one of the loops (front or back) or the full stitch? That’s what’s slightly confused me.
I cannot make sense of the legs. The 4 stitches that are on the body, do you do that for each leg?
I answered your question on Facebook 🙂
No, you do that for the firs leg only, for all the other legs is sc16 on the body and then ch16, everything else is the same 🙂
Printer friendly version omits rows 12-21 on the body
It works fine for me. Can you try in another browser maybe?
Do you have a video tutorial for any of your projects? Especially Dexter since he’s what I’m currently working on. Just chained 11, in fac., So I’ve not run into any problems yet. LOL
unfortunately no video tutorials yet. But I’ll give my best to help you in some other way if needed 🙂
OK I didn’t have any trouble with the body. Now, I’m ready to start the first leg and am a bit confused. I am a left-handed crocheter and am nt sure if I should follow the directions/pictures as you show? I can’t seem to wrap my brain around the problem. Once I’ve chained 16, do I go backward past the starting marker to begin the leg? I’m trying to reversed the picture in my mind. I guess I can try and see what happens. Ripping back is always an option.
Hi there!
I’m a beginner, and I was wondering about step 14 of the Body. It says “-21.” What does this mean?
Thank you!
It means from row 14 to row 21 🙂
Muchisimas gracias!!
Hi There! noticed the printable version has the body step ten missing! Haven’t checked the rest xx Thanks! I’ve just started crochet and this is my first non scarf!
Hi Jenni. Try to open it in another browser. There shouldn’t be anything missing.
Hi,
Thank you so much for sharing this pattern!
I was looking for a dino head to make a dino puzzle ball and this was perfect for it.
Thanks a lot 😀