
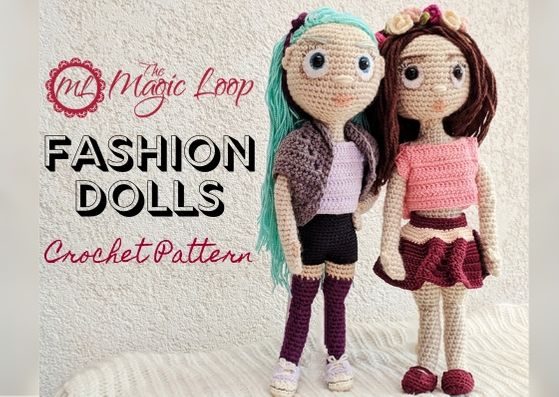
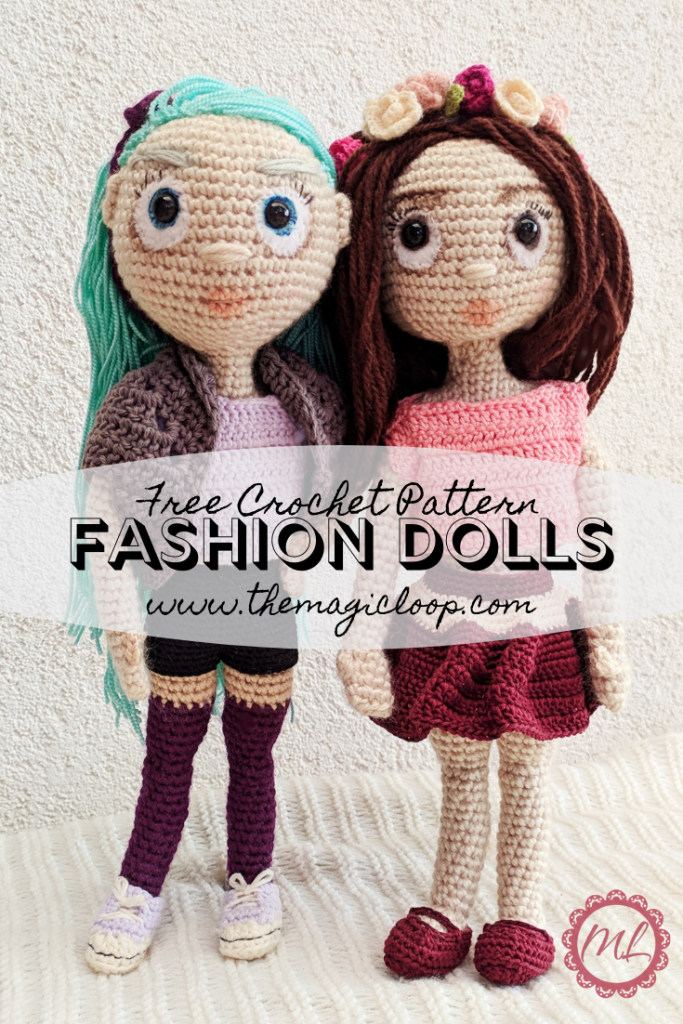
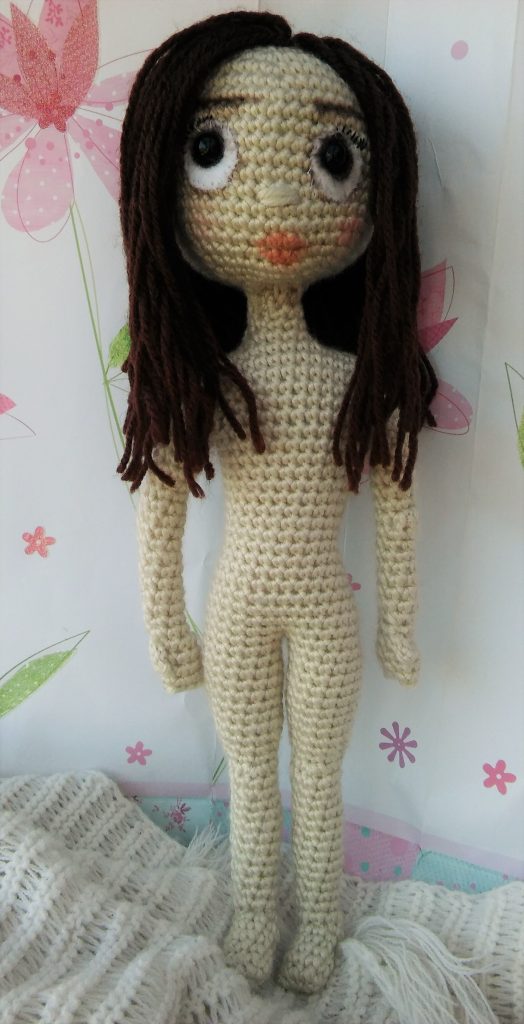
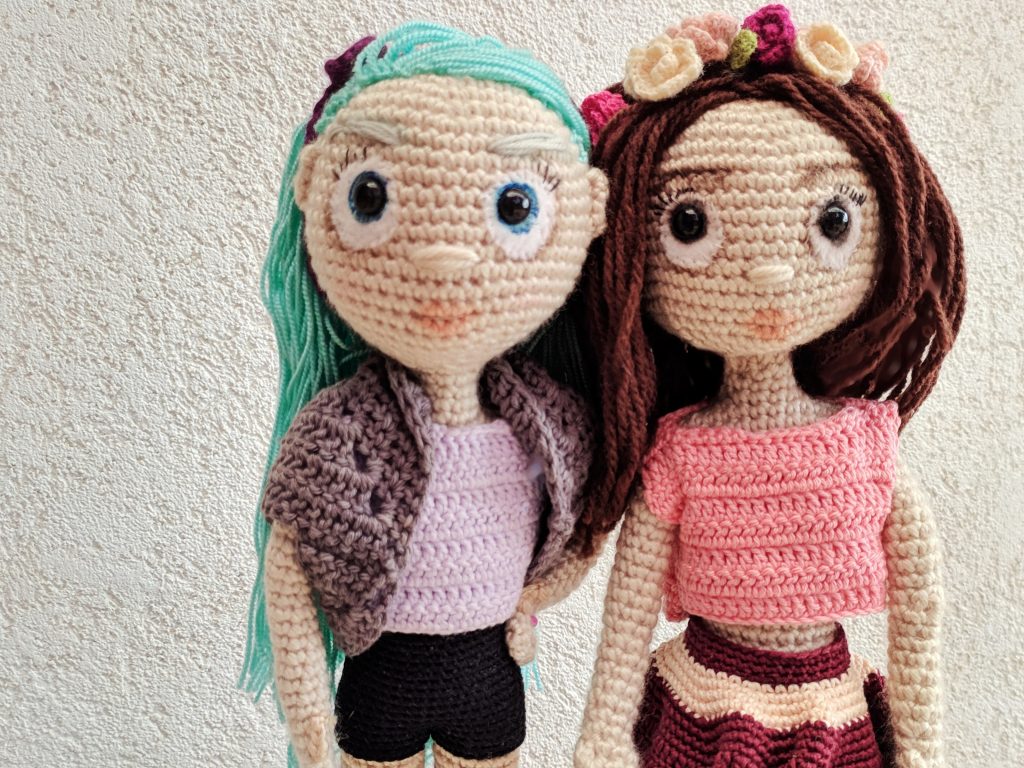
This crochet doll is highly customizable. You can dress her up however you like. You can change her hairstyle too. The doll is 33cm/13 inches tall if you make her with suggested hook size and yarn weight. Her hands are movable. When your crochet doll is done, click here for clothes patterns.
Hook this pattern on Ravelry by clicking here.
– Materials:
– Crochet hooks (for 33cm/13inches tall doll):
• for the body 4mm/US G,
• for the clothes 2,5mm/US C,
• and for the little flowers 1,5mm.
NOTE: You can use larger hooks for the flowers, you will just end up with larger flowers.
– Yarn:
- For the head and the body use Aran (4) weight yarn. (I used Red Heart Soft.)
- For the clothes use Fine (2) weight yarn. (I used Catania Denim from Schachenmayr.)
- For the flowers use crochet thread or some very fine yarn.
- For the hair use any yarn you like.
- Additional:
- Tapestry needle
- Stuffing
- Something to stabilize the head. (I used an old pen. You can choose a wooden or plastic stick, just remember to use something without sharp and pointy ends if you’re making this for a child.)
- Optional:
- Safety eyes (I used 10mm)
- Little pieces of white felt for the eyes
- White sewing thread
- Sewing needle
- Embroidery floss
- Paint, craft chalk or make-up (I used make-up for adding some face features. Use something non-toxic if you’re making this for a child.
– Skills required:
- Amigurumi making experience: Advanced Beginner
- Basic sewing skills
- Basic embroidery skills (Optional)
– US Terminology and Abbreviations:
- ch – chain stitch
- sc – single crochet
- sc2tog –sc next 2 stitches together
- sc2inc – sc2 in next stitch
- dc – double crochet
- dc2tog – dc next 2 stitches together
- dc2inc – dc2 in next stitch
- ML – magic loop/magic circle/magic ring
- slst – slip stitch
- hdc – halfdouble crochet
Let’s start!
– The Head
Starting with the head. From the top. Working in rounds.
- sc6 in ML (6)
- sc2inc x 6 (12)
- (sc, sc2inc) x 6 (18)
- (sc2, sc2inc) x 6 (24)
- (sc3, sc2inc) x 6 (30)
- (sc4, sc2inc) x 6 (36)
- (sc5, sc2inc) x 6 (42)
- (sc6, sc2inc) x 6 (48)
- – 18. sc48 around (48)
19. (sc2tog, sc6) x 2, sc2tog, sc12, sc2tog, (sc6, sc2tog) x 2 (42)
20. (sc2tog, sc5) x 2, sc2tog, sc10, sc2tog, (sc5, sc2tog) x 2 (36)
21. (sc2tog, sc4) x 2, sc2tog, sc8, sc2tog, (sc4, sc2tog) x 2 (30)
22. (sc2tog, sc3) x 2, sc2tog, sc6, sc2tog, (sc3, sc2tog) x 2 (24)
23. (sc2tog, sc2) x 2, sc2tog, sc4, sc2tog, (sc2, sc2tog) x 2 (18)
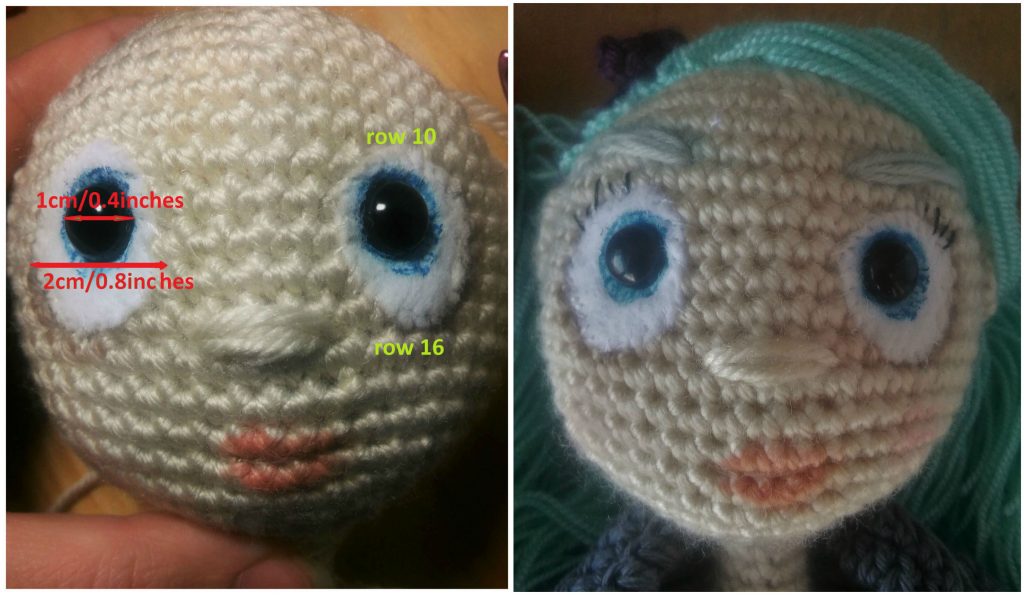
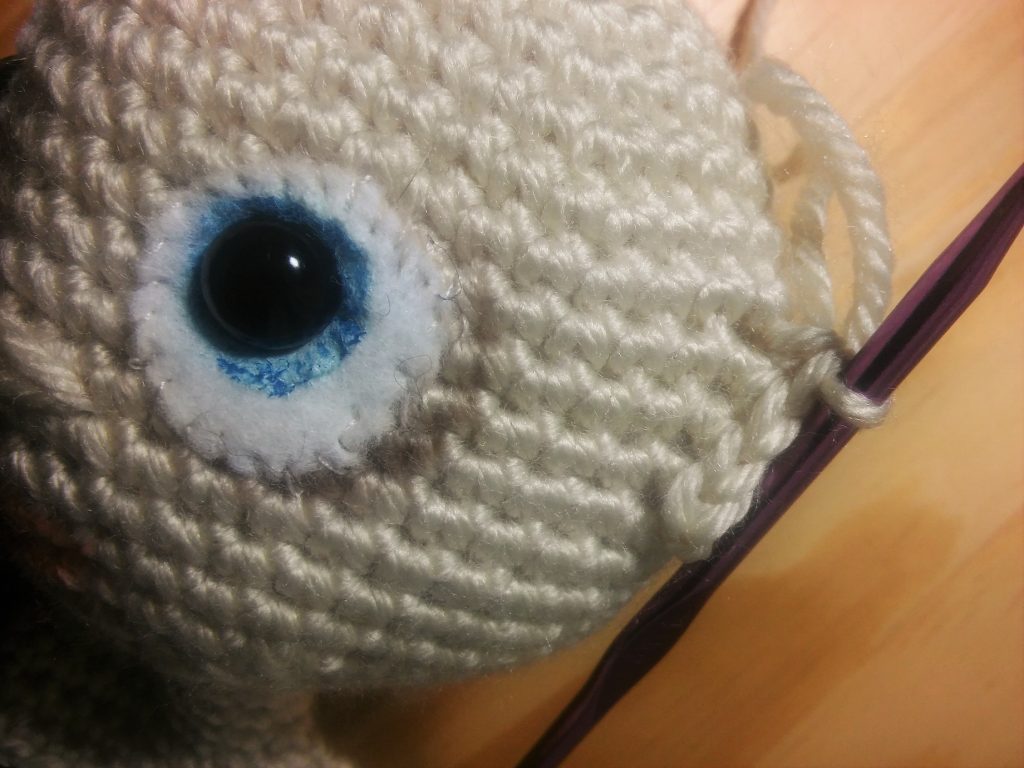
Now is a good time to make the face of your crochet doll. Your hook should be on the back side of the head. Highlighted purple sc2tog from the previous rows represent the stitches framing the face and forming the chin. Cut 2 circles of white felt approximately 2cm/0.8 inches in diameter, make a hole for safety eyes. Use paint or make-up to make colored iris. The eyes should be placed between rows 10 and 16. Sew the eyes onto the face. For the rest of the features you can use make-up(paint) and/or embroider them. Stuff the head.
24. (sc, sc2tog) x 6 (12)
25. sc3, sc2tog, sc4, sc2tog, sc (10)
26. – 28. sc10 around (10) Don’t cut the yarn but continue working the body.
– The Body
First sc3 to mark a new beginning of the rounds and continue working the rounds.
29. sc2, ch6 (for the shoulder), sc5 down the chain, sc5 on the neck, ch6 (the other shoulder), sc5 down the chain, sc3 on the neck (30)
30. – 32. sc30 around (30)
33. sc6, sc2tog, sc13, sc2tog, sc7 (28)
34. – 36. sc28 around (28)
37. sc6, sc2tog, sc12, sc2tog, sc6 (26)
38. – 39. sc26 around (26)
40. sc5, sc2tog, sc11, sc2tog, sc6 (24)
41. sc24 around (24)
42. sc5, sc2tog, sc11, sc2tog, sc4 (22)
43. sc2tog, sc20 (21)
44. sc4, sc2tog, sc10, sc2tog, sc3 (19)
45. sc4, sc2inc, sc10, sc2inc, sc3 (21)
46. sc4, sc2inc, sc12, sc2inc, sc3 (23)
47. sc4, sc2inc, sc14, sc2inc, sc3 (25)
48. sc25 around (25)
49. sc4, sc2inc, sc16, sc2inc, sc3 (27)
50. sc2tog, sc3, sc2inc, sc16, sc2inc, sc4 (28)
51. – 52. sc28 around (28)
Don’t cut the yarn. Insert the stick trough the body, neck and head to stabilize it. Stuff the body.
– The Legs
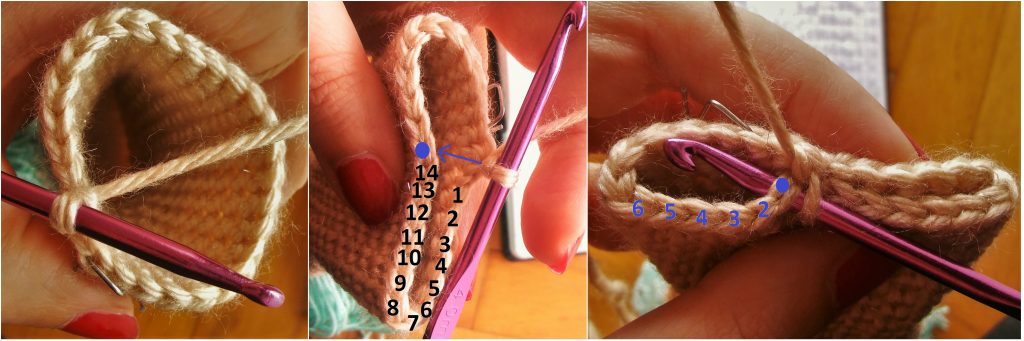
First sc2 to get your hook in the middle of the body. Follow the pictures.
First picture shows the current position of the hook, now turn your work 180°, so the front of the body is facing you.
- skip 14 stitches (shown on the second picture marked with the black numbers), insert your hook in the next stitch (marked with blue dot, insert the hook from the outside), sc6 (marked with blue numbers), sc2inc, sc7 (15) – continue working in rounds. Every few rows remember to stuff the leg.
- – 6. sc15 around (15)
- sc7, sc2tog, sc6 (14)
- – 9. sc14 around (14)
- sc7, sc2tog, sc5 (13)
- sc2tog, sc5, sc2tog, sc4 (11)
- sc2tog, sc4, sc2tog, sc3 (9)
- sc3, sc3inc, sc3, sc2tog (10)
- sc10 (10)
- sc, sc2tog, sc4, sc2tog, sc (8)
- sc2inc, sc6, sc2inc (10)
- sc10 around (10)
- sc2inc, sc9 (11)
- sc11 around (11)
- sc2tog, sc9 (10) 21. sc10 (10)
- sc2tog, sc8 (9)
- sc9 around (9)
- sc2tog, sc7 (8)
- sc8 around (8)
- sc2tog, sc6 (7)
- dc2inc x 2(the heel), sc5 (9)
- sc2tog x 2, sc5 (7)
- sc7 (7)
- sc2inc, sc2, sc2inc, sc3 (9)
- – 32. sc9 around (9)
Fasten off and leave a long tail for sewing. Use that tail to close the leg.
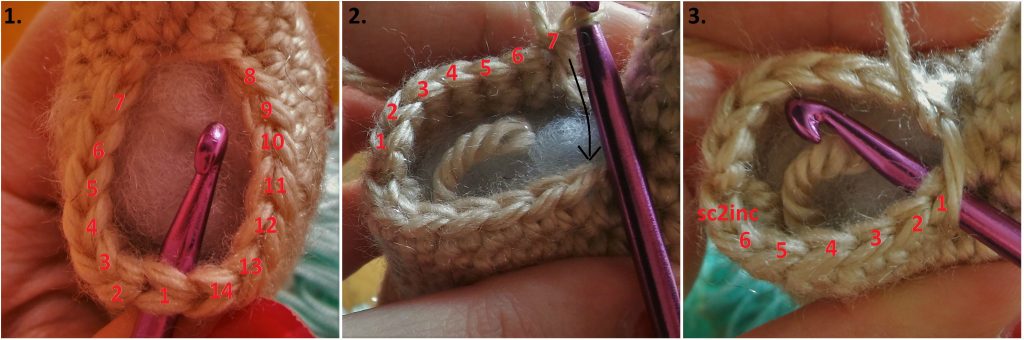
Pictures show the beginning of the other leg. First attach the yarn in the stitch marked with number 1 as shown in 1st picture. Make 1st sc in the same stitch in which you attached the yarn, sc6 more, turn your work and insert the hook in the stitch on which the arrow is pointing, sc6, sc2inc (15)
Work the instructions for the first leg from 2nd row until the last one.
– The Arms
Work in oval. Make two.
- ch3
- in 2nd chain from hook sc2inc, sc3inc, continue around, sc in the same chain you made sc2inc (6)
- sc2inc in the first stitch of sc2inc from 2nd row, sc2, sc2inc, sc2 (8)
- – 25. sc8 around (8)
Fasten off, leave a long tail for sewing. Stuff the hands lightly with a small amount of stuffing. Close them by sewing the opening and then sew them onto the body. Make thumbs by attaching the yarn in a space between 3rd and 4th row. Make one single crochet in the same space and one in the space between rows 4 and 5. Slip stitch in the space between rows 5 and 6, fasten off.
– The Ears
Attach the yarn in between rows 13 and 14 and make sc1, sc3
more in next 3 spaces, chain1, turn your work, sc1, slst x 2,
sc1, slst in the same stitch where you made your first sc1.
Fasten off.
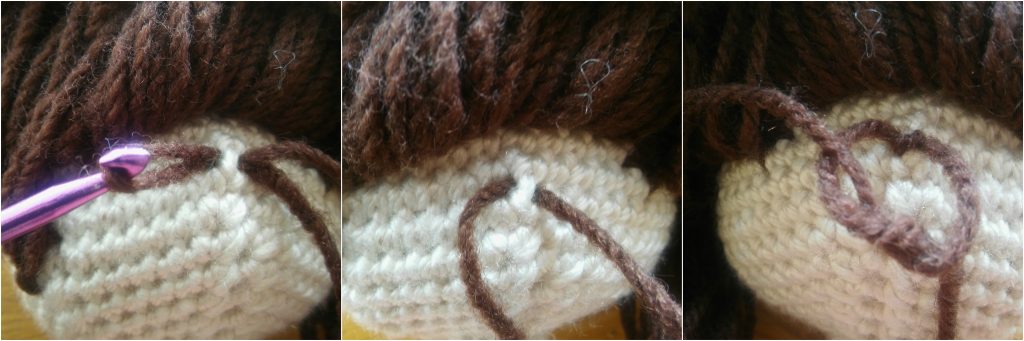
– Adding Hair
That’s it!
Your crochet doll is done! I hope you had fun crocheting. Now click here and choose some clothes and accessories to make for her.
If you have any questions or comments, feel free to contact me in comments section of this post, on my Facebook page, or by email contact@themagicloop.com. Also, if you make Fashion Dolls, send me some pictures, I’ll publish them on my Facebook page. You can tag me on Instagram @themagicloop.
This pattern is copyright of Barbara Peček / TheMagicLoop.com . Please do not claim this pattern as your own. If you wish to share this pattern, you may link to this pattern but please do not reprint it on your site. Do not sell this pattern or parts of this pattern. You may sell finished items made from this pattern, but please clearly credit the design to me and provide a link to my website www.themagicloop.com.


11 Comments
I really had fun making this doll. Its made different then others I have tried with the shoulders. The legs were kinda tricky but I think it came out okay.Thanks so much for sharing your work also for the clothe patterns which I have not made yet…Thanks again