

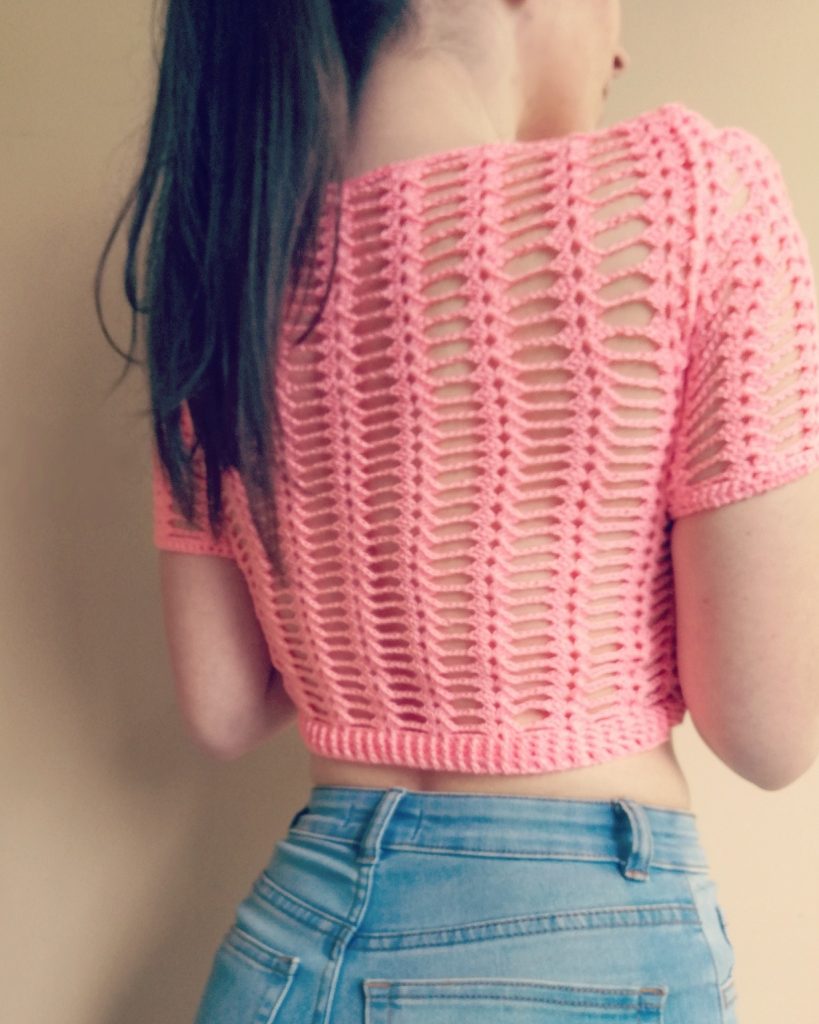
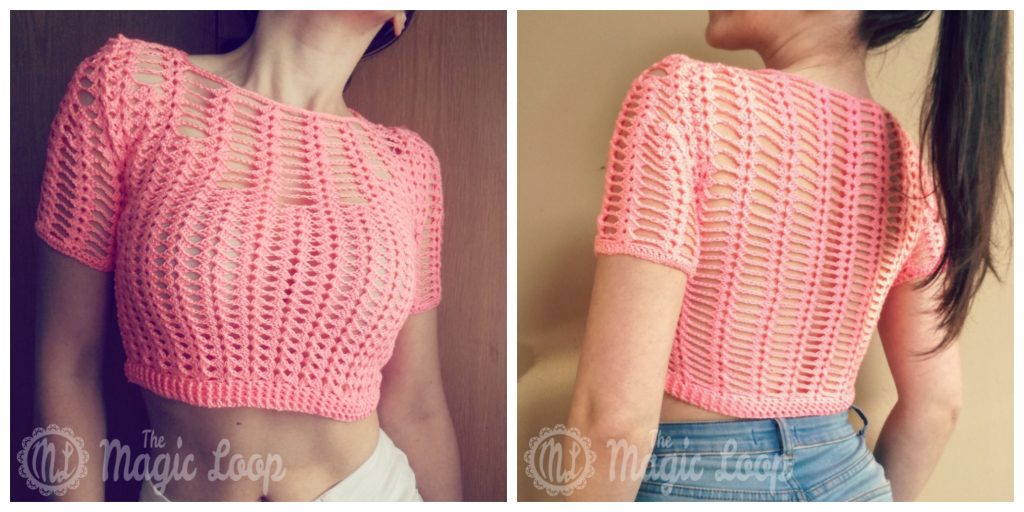
Sweet Summer crochet crop top is simple to make and requires intermediate crochet skills. There is no sewing, so the sleeves are connected to the crop top with some crochet stitches. You can use whichever yarn you prefer, but I recommend using mercerised cotton or regular cotton yarn.
Hook Sweet Summer crochet crop top on Ravelry here.
To make this Sweet Summer crochet crop top you only need:
- crochet hook – 3.5mm (US E)
- fingering weight yarn (14wpi)
- scissors
This pattern uses US terminology and these abbreviations:
- sc – single crochet
- ch – chain
- dc – double crochet
- bpdc – back post double crochet
- fpdc – front post double crochet
- slst – slip stitch
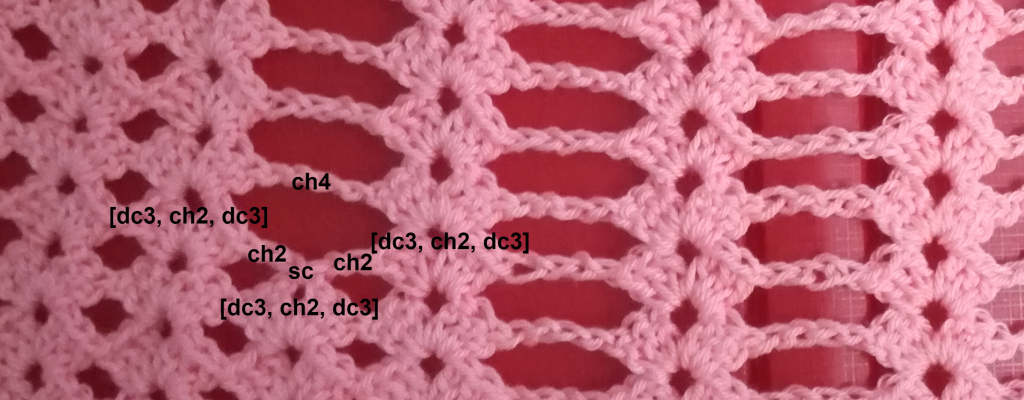
- this part [dc3, ch2, dc3] shows up way to many times, so I used [xxx] instead
Let’s start!
– Foundation chain –
Worked in the round from the button up.
Firstly, make a foundation chain:
- XS and S – ch 160
- M and L – ch 178
Join the end of the chain to the first chain with a slst and be careful not to twist it. The chain should fit loosely around your bust, so try it on before you go ahead.
– Bottom Edge –
Continue from the joining slst, ch3. This will stand for the first dc stitch. Now do one dc stitch in each chain stitch (ch3 + 159dc = 160 stitches). Slst in the top ch of starting ch3.
Ch3, and continue by making one fpdc following by one bpdc to the end of the row to get a ribbed look. Slst in the top ch of ch3. Repeat these instructions for two more rows, or more if you want bigger bottom edge.
– Back Side –
Continuing from the slst, ch3 (this stands for the first dc stitch), and work the stitches in the square brackets all in the same stitch where you made slst: [dc2, ch2, dc3]. Ch4 and skip next 7 stitches. In 8th stitch do [dc3, ch2, dc3], ch4 and skip next 7 stitches. Repeat ([xxx], ch4) 8 more times for small sizes and 9 times for Sizes M and L.
– Front Side –
Now that you have 4 chains on your hook and you skipped 7 stitches, continue by doing [dc3, ch2, dc3] all in the same stitch. Skip 4 stitches and do [dc3, ch2, dc3] in the 5th. Continue this step until you reach the end of this row and slst in top ch of ch3. You should have 17 [xxx] next to each other for small sizes and 19 for sizes M and L
– Front and Back –
Start the next row by slst in each of the next 2 dc stitches and in the 2ch space and then ch3(stands for dc). [dc2, ch2, dc3] in 2 chain s犀利士 pace. The next part is really simple: Ch4 above every ch4 from the row bellow and [xxx] in every ch2. Now, repeat these instructions 18 more times for sizes XS and S, 20 for M and L. Fasten off and cut the yarn.
– Back side, part 2 –
Worked flat, not in the round.
– Sizes XS and S, skip the first ch4 space, join yarn in the second ch2 space and [ch3, dc2, ch2, dc3], ch4, ([xxx], ch4) 7 more times, [xxx], ch1 and turn your work!
Slst in each of the next 2 dc stitches and in the 2ch space and then ch3(stands for dc). [dc2, ch2, dc3] in 2 chain space. Now do (ch4, [xxx]) 8 times, ch1 and turn. Repeat this row 10 more times.
– Sizes M and L, skip the first ch2 space and ch4 space, join yarn in the second ch2 space and [ch3, dc2, ch2, dc3], ch4, ([xxx], ch4) 8 more times, [xxx], ch1 and turn your work! Repeat this row 12 more times.
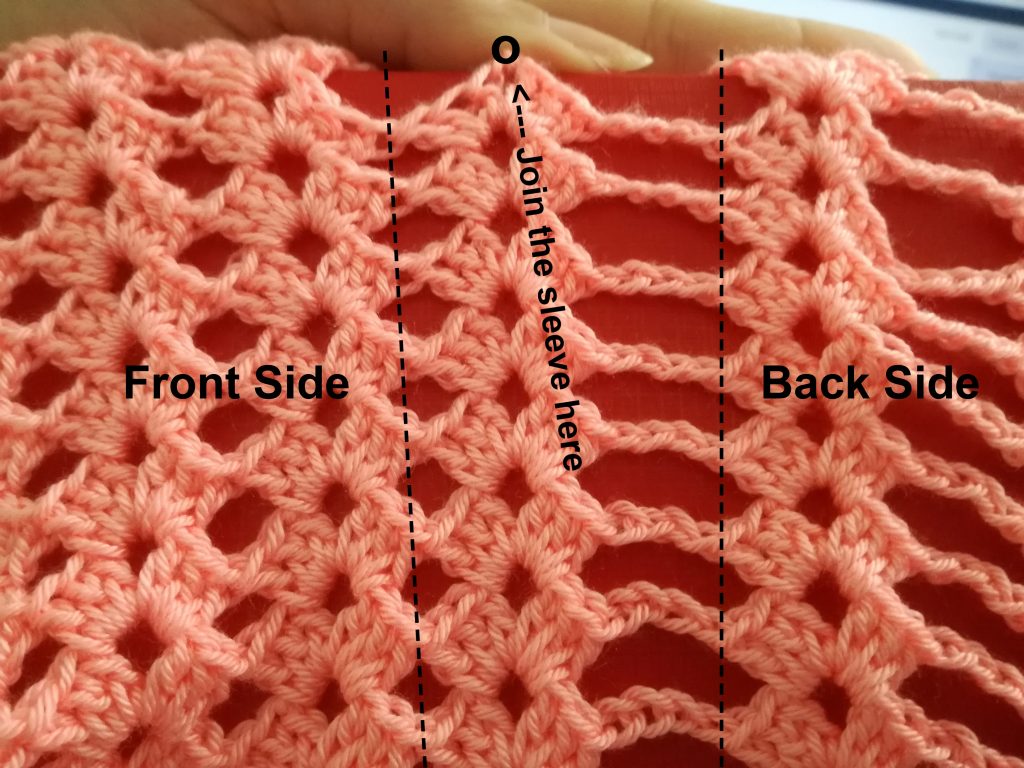
– Front side, part 2 –
–Sizes XS and S–
Also worked flat.
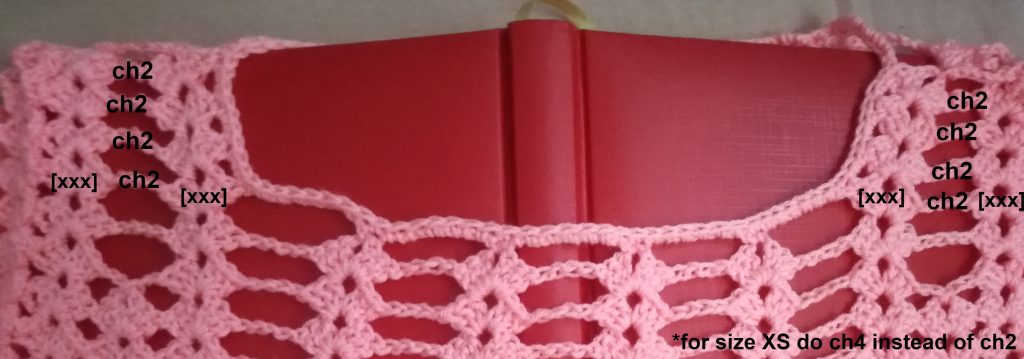
1.-skip the first ch2 space (you’ll join the sleeve here later), join yarn in the second ch2 space and [ch3, dc2, ch2, dc3], [xxx] 6 times, ch2, sc1 in ch2 space, ch2, [xxx] 7 more times, ch1 and turn your work!
2.–Slst in each of the next 2 dc stitches and in the ch2 space and then ch3(stands for dc). [dc2, ch2, dc3] in 2 chain space, [xxx] 6 times, ch4, [xxx] 7 times, ch1 and turn. (Each row starts and ends the same.)
3.-[xxx] 5 times, ch2, sc1 in ch2 space, ch3, [xxx], ch4, [xxx], ch3, sc1 in ch2 space, ch3, [xxx] 5 times.
4.-[xxx] 5 times, ch4, [xxx], ch4, [xxx], ch4, [xxx] 5 times.
5.-[xxx] 3 times, ch2, sc1 in ch2 space, ch2, [xxx], (ch4, [xxx]) 3 times, ch2, sc1 in ch2 space, ch2, [xxx] 3 times.
6.-[xxx] 3 times, (ch4, [xxx]) 5 times, [xxx] 2 times.
7.-[xxx], ch2, sc1 in ch2 space, ch2, [xxx], (ch4, [xxx]) 5 times, ch2, sc1 in ch2 space, ch2, [xxx].
8.-[xxx], (ch4, [xxx]) 7 times.
9.-12.[xxx], ch4, [xxx].
13.-slst in next 2 dc stitches and ch2 space, join front and back side by making one sc trough first ch2 space on both sides, ch4, sc trough second ch2 space on both sides. Fasten off. Repeat rows 9 to 13 on the other side of the top.
–Sizes M and L–
1.-skip the first ch2 space(you’ll join the sleeve here later), join yarn in the second ch2 space and [ch3, dc2, ch2, dc3], [xxx] 8 more times, ch2, sc1 in ch2 space, ch2, [xxx] 9 more times, ch1 and turn your work!
2.–Slst in each of the next 2 dc stitches and in the ch2 space and then ch3(stands for dc). [dc2, ch2, dc3] in 2 chain space, [xxx] 8 times, ch4, [xxx] 9 times, ch1 and turn. (Each row starts and ends the same.)
3.-[xxx] 7 times, ch2, sc1 in ch2 space, ch2, [xxx], ch4, [xxx], ch2, sc1 in ch2 space, ch2, [xxx] 7 times, ch1 and turn.
4.-[xxx] 7 times, ch4, [xxx], ch4, [xxx], ch4, [xxx] 7 times, ch1 and turn.
5.-[xxx] 5 times, ch2, sc1 in ch2 space, ch2, [xxx], (ch4, [xxx]) 3 times, ch2, sc1 in ch2 space, ch2, [xxx] 5 times, ch1 and turn.
6.-[xxx] 5 times, (ch4, [xxx]) 5 times, [xxx] 4 times, ch1 and turn.
7.-[xxx] 3 times, ch2, sc1 in ch2 space, ch2, [xxx], (ch4, [xxx]) 5 times, ch2, sc1 in ch2 space, ch2, [xxx] 3 times, ch1 and turn.
8.-[xxx] 3 times, (ch4, [xxx]) 7 times, [xxx] 2 times, ch1 and turn.
9.-[xxx], ch2, sc1 in ch2 space, ch2, [xxx], (ch4, [xxx]) 7 times, ch2, sc1 in ch2 space, ch2, [xxx], ch1 and turn.
10.-[xxx], (ch4, [xxx]) 9 times, ch1 and turn.
11.-14.[xxx], ch2, [xxx], ch1 and turn.
15.-slst in next 2 dc stitches and ch2 space, join front and back side by making one sc trough first ch2 space on both sides, ch2, sc trough second ch2 space on both sides. Fasten off. Repeat rows 11 to 15 on the other side of the top.
– Sleeves –
Work in the round. First make a foundation chain of 56 chains for sizes XS and S, and 64 for sizes M and L. And connect the two ends with a slst.
–Sizes XS and S–
1.ch3(stands for 1st dc), dc55, slst in top ch of ch3
2.-9. ([xxx], ch4, skip7) x7,
10.-11. ([xxx], ch4, skip7] x5, [xxx], ch1 and turn,
12. ([xxx],ch2) x2, ([xxx], ch4), ([xxx], ch2) x2, [xxx], ch1 and turn,
13. ([xxx], ch) x2, [xxx], ch4, [xxx], ([xxx], ch) x2, ch1 and turn,
14. [xxx], ch, sc in ch2 space, ch, [xxx], ch4, [xxx], ch, sc in ch2 space, ch, [xxx], ch1 and turn,
15. [xxx], ch2, [xxx], ch3, [xxx], ch2, [xxx], ch1 and turn,
16. ([xxx], ch) x3, [xxx], ch1 and turn,
17. [xxx] x4, ch1 and turn,
18. [xxx], ch2, sc in ch2 space, ch2, sc in ch2 space, ch2, [xxx], ch1 and turn,
19. [xxx], ch4, [xxx], ch1 and turn,
20. [xxx], ch2, [xxx], ch1 and turn,
21. [xxx] x2, fasten off.
— Sizes M and L–
1.ch3(stands for 1st dc), dc63, slst in top ch of ch3
2.-10. ([xxx], ch4, skip7) x8,
11. ([xxx], ch4, skip7] x6, [xxx], ch1 and turn,
12. ([xxx],ch2) x2, ([xxx], ch4) x2, ([xxx], ch2) x2, [xxx], ch1 and turn,
13. ([xxx], ch) x2, ([xxx], ch4) x2, ([xxx], ch) x2, ch1 and turn,
14. [xxx] x3, ch4, [xxx], ch4, [xxx] x3, ch1 and turn,
15. [xxx], ch2, sc in 2ch space, ch2, [xxx], ch4, [xxx], ch4, [xxx], ch2, sc in 2ch space, ch2, [xxx], ch1 and turn,
16. ([xxx], ch4) x4, [xxx], ch1 and turn,
17. ([xxx], ch2) x4, [xxx], ch1 and turn,
18. [xxx] x5, ch1 and turn,
19. [xxx], ch2, sc in 2ch space, ch2, [xxx], ch2, sc in 2ch space, ch2, [xxx], , ch1 and turn,
20. ([xxx], ch4) x2, [xxx], ch1 and turn,
21. ([xxx], ch2) x2, [xxx], ch1 and turn,
22. [xxx] x3, ch1 and turn,
23. [xxx] ch, sc in 2ch space, ch, [xxx], ch1 and turn,
24. [xxx] x2, fasten off.
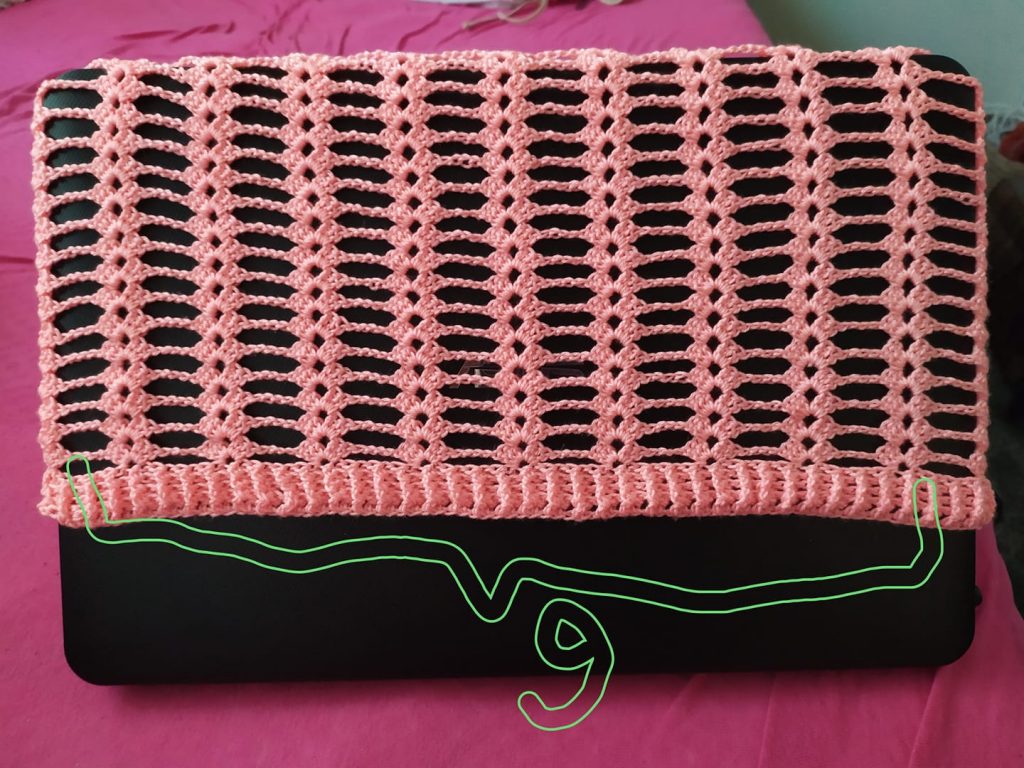
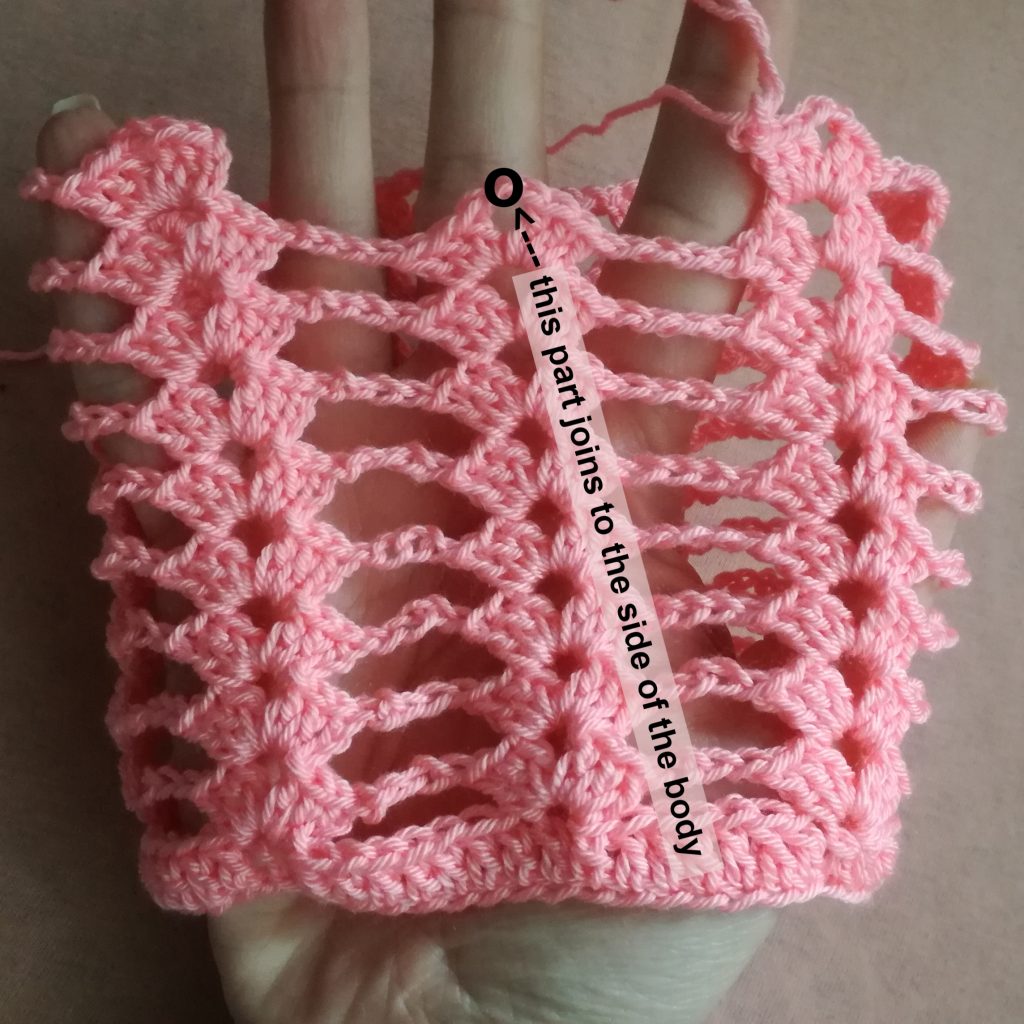
Joining the Sleeves
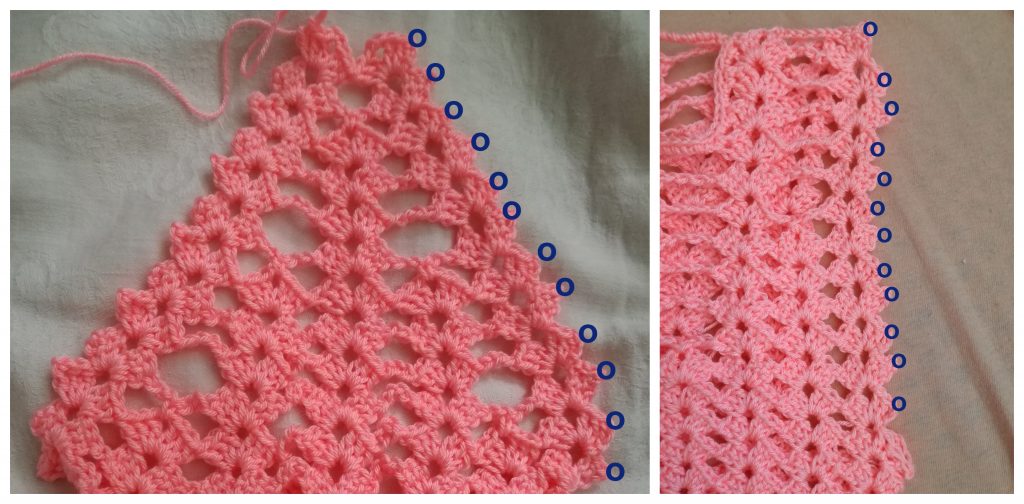
First turn the sleeve and the body of the crop top inside-out. Align the two parts marked with the blue circles. Pull your hook trough the top pointy end (marked with a blue circle) and trough the top pointy end of the body, pull the yarn trough and do your first sc stitch. Chain two, sc in the second pointy end of the sleeve and of the body. Continue to the bottom. That’s 12 pointy ends for sizes XS and S, and 14 for sizes M and L. Chain 4 and sc1 in 2ch space (marked with a black circle) and 2ch space on the body of the crop top. Chain 4 and continue making sc1, ch2 on the other side.
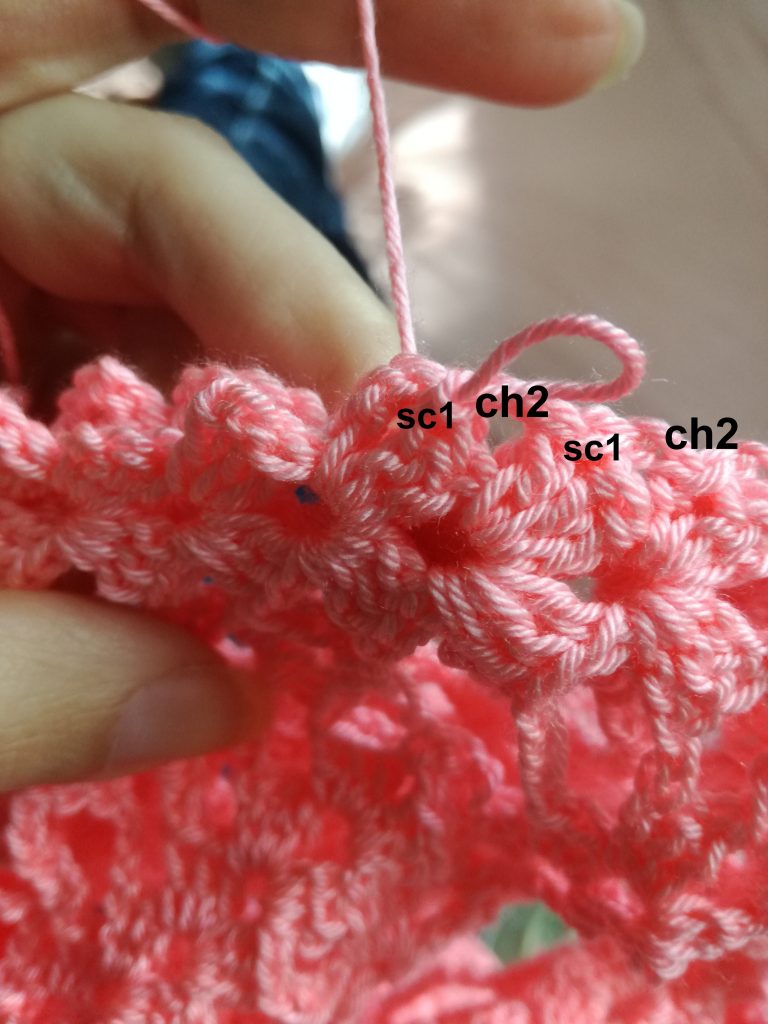
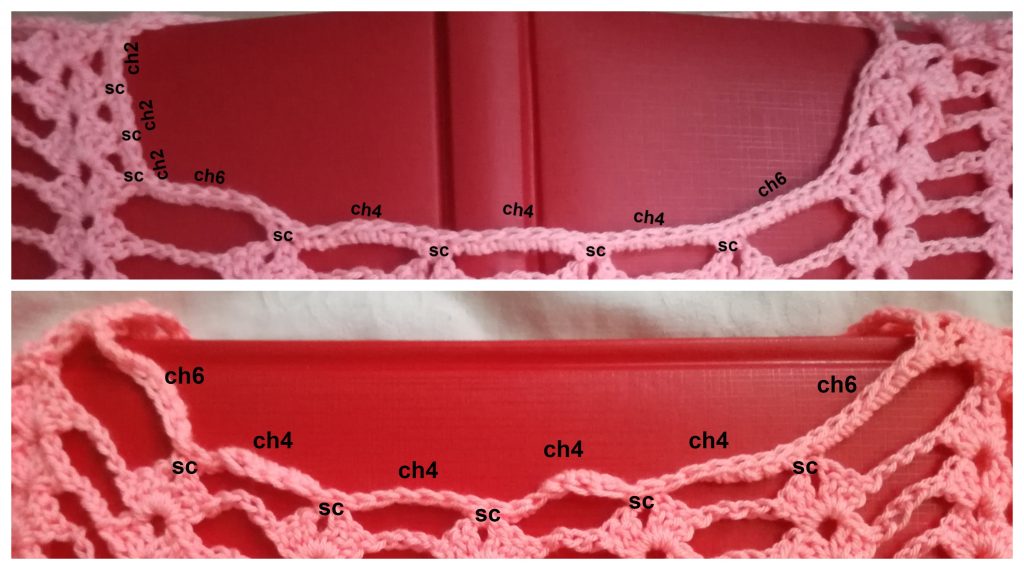
The neckline
Connect all the outside [xxx] parts of the top to make a round neckline. Do one sc stitch in the side of every [xxx],rows 9-12 for sizes XS and S, and 11-14 for sizes M and L). Chain 2 between every sc stitch. Ch 6 and sc in 2ch space of row 8 for smaller sizes and row 10 for larger sizes. Chain 4 between every sc stitch you do in 2ch space and chain 6 between every sc you do on the side of [xxx] that connects to the sc in 2ch space. For the next row of the neckline, do one sc stitch for every chain you made(2ch=2sc, 4ch=4sc…) and one in every sc stitch you made in the first row.
That’s it!
If you have any questions or comments about Sweet Summer crochet crop top, feel free to contact me in comments section of this post, on my Facebook page, or by e-mail themagicloop.com@gmail.com. Also, if you make this crochet crop top, send me some pictures, I’ll publish them on my Facebook page. On the other hand, you can tag me on your Instagram or Facebook post so I can share those.
Most importantly, have fun making your crochet crop top.
In addition, you can support me by sharing this post or by buying my other patterns on Etsy or Ravelry.

This pattern is copyright of Barbara Peček / TheMagicLoop.com . Please do not claim this pattern as your own. If you wish to share this pattern, you may link to this pattern but please do not reprint it on your site. Do not sell this pattern or parts of this pattern. Lastly, you may sell finished items made from this pattern, but please clearly credit the design to me and provide a link to my blog www.themagicloop.com.

13 Comments
First off, I love this pattern. Next, lol I had read part of this part before I actually Read the whole pattern was a little confused. This is definitely in my cue! Thanks for posting! I had to remember that your ‘[xxx]’ meant {shell}… lol
I love this pattern! Easy to follow and makes quite the stylish top. Only problem was that the measurements were too big for me, even the XS, had a hard time trying to make it fit and follow the correct pattern lmao x
Yes same for me but I did make the top, but I had to adjust the foundation stitch, was very tricky and the front looks a little different, but it still looks good