
Make your own crochet doll using my free pattern – click here! When you’re done, come back here and make some fashionable clothes for her. The possibilities are endless.
– Materials:
- crochet hook size 2.5mm/ US C
- light weight yarn
– Shirt pattern
Make front and back side separately and join later by crocheting or sewing them together. Both parts are done from the bottom up.
The Front side:
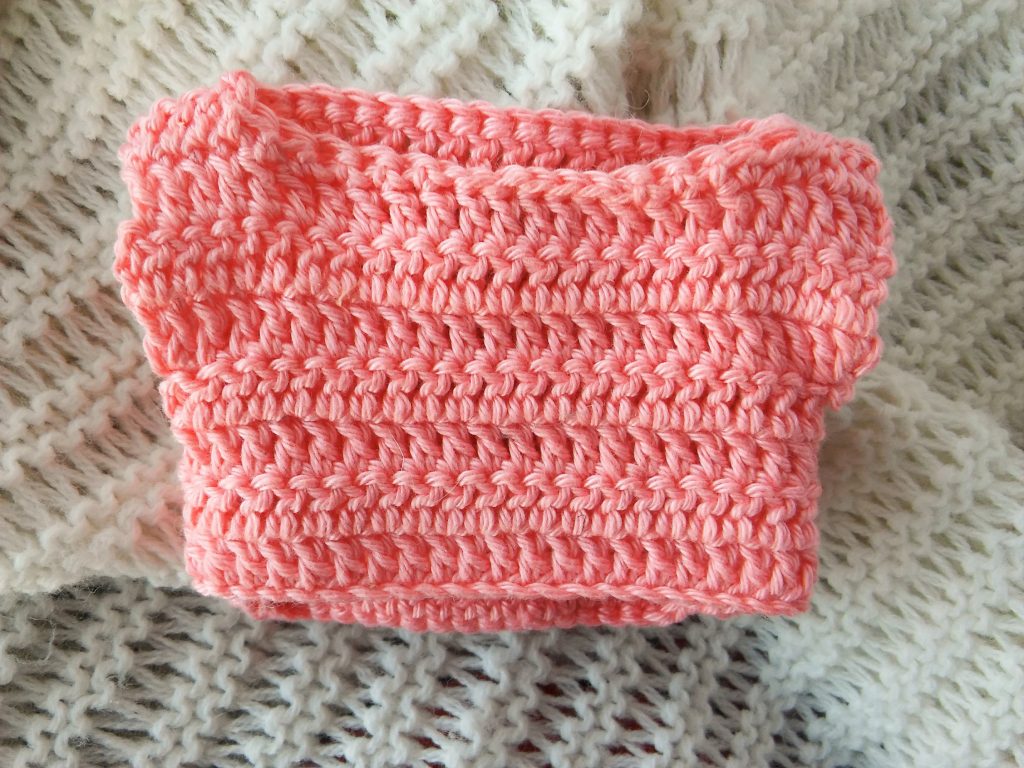
- ch25
- In 4th chain from hook make 1 dc, dc21 until you reach the end of the chain, ch1 and turn (22)
3. – 5. dc22, ch1 and turn (22)
6. dc2inc, dc20, dc2inc, ch1 and turn (24)
7. – 8. dc24, ch1 and turn (24)
9. dc3, hdc3, sc3, slst6, sc3, hdc3, dc3 (24)
Fasten off.
– The Back side:
1.– 5. Work the same as for the front side.
6. add one more row of dc22 (22)
7. dc2inc, dc20, dc2inc, ch1 and turn (24)
8. – 10. dc24, ch1 and turn (24)
Fasten off.
The back side is one row longer, so leave the bottom row as it is, don’t join it to the front side. Instead, start with joining the second row of dc22 of the back side to the first row of dc22 of the front side as shown in the picture below. Join 3rd row of back to 2nd row of front, 4th row of back to 3rd row of front and 5th row of back to 4th row of front.
Join top rows by crocheting or sewing them together. Join just the first 3 stitches on each side. You should be able to put it on your doll feet first and pull it up.

– The Skirt
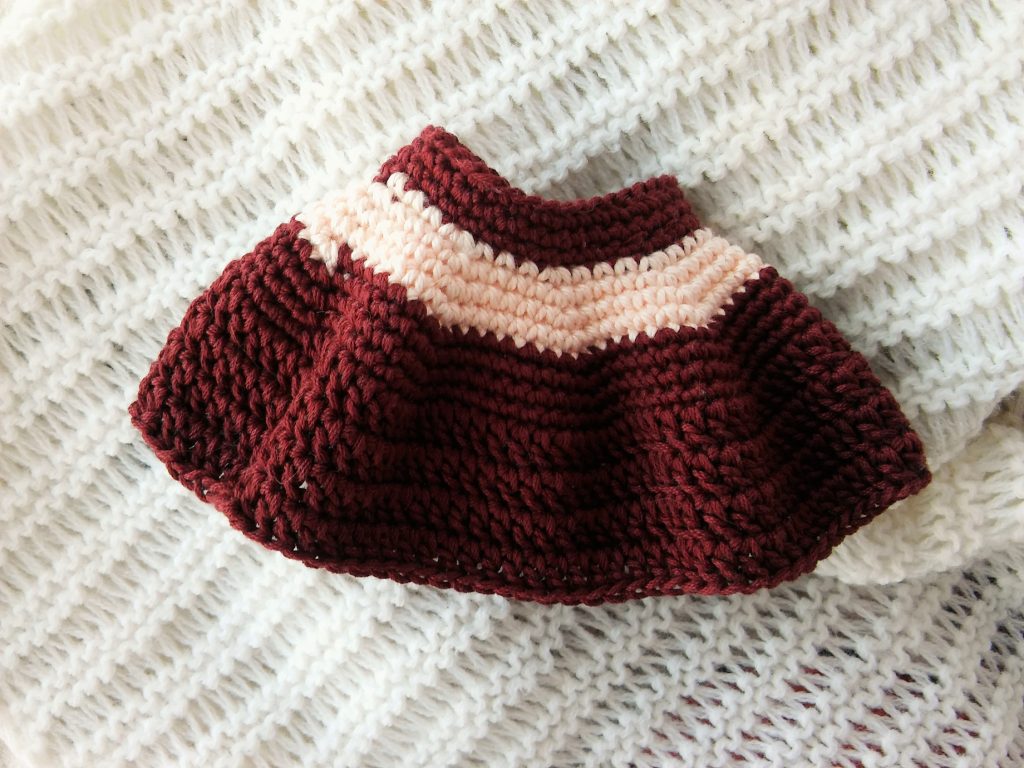
1. ch36,
2. make a circle by making 1 sc in the first chain and continue by making sc35 around (36)
3. – 4. sc36 around (36)
5. (sc3, sc2inc) x 9 (45)
6. (sc4, sc2inc) x 9 (54)
7. (sc5, sc2inc) x 9 (63)
8. (sc6, sc2inc) x 9 (72)
9. (sc7, sc2inc) x 9 (81)
10. (sc8, sc2inc) x 9 (90)
11. (sc9, sc2inc) x 9 (99)
12. – 15. dc99 around (99)
Keep adding rows of dc99 if you want a longer skirt. Slst and fasten off.
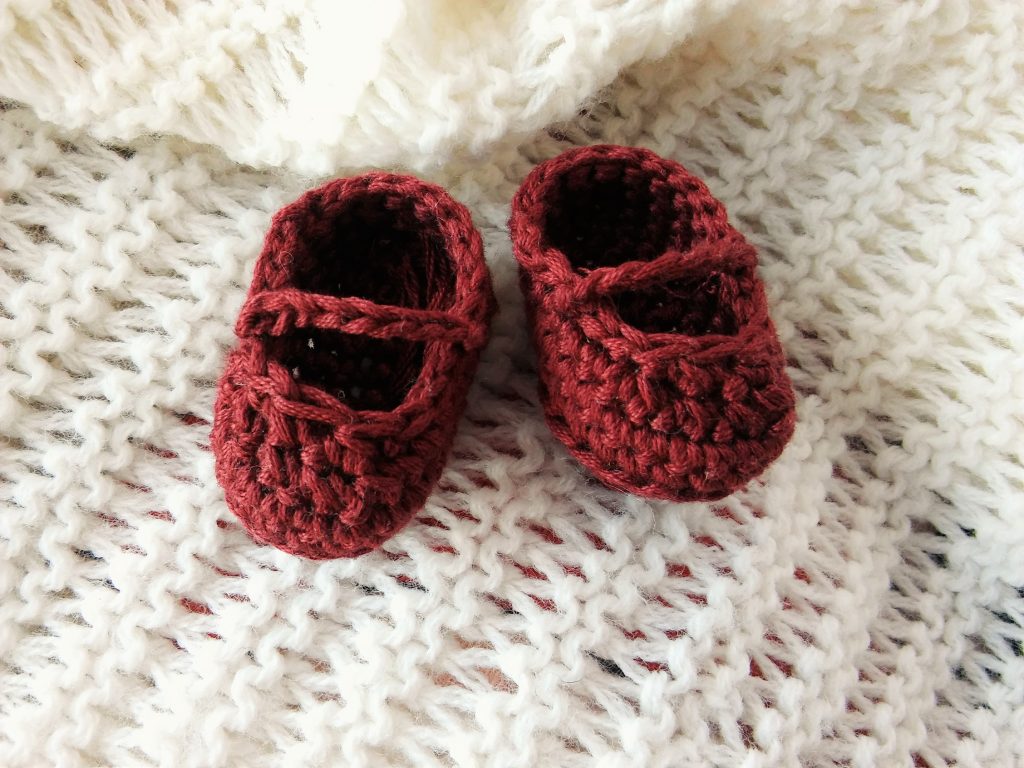
– The Shoes
Work in oval.
1. ch8
2. in second chain from hook sc2inc, sc5, sc3inc, sc5, sc1 in the same chain you made sc2inc (16) Now you should have an oval that has 3 stitches on ends and 5 stitches on each side.
3. sc3inc in first sc of sc2inc you made in previous row, sc4, hdc2, dc2inc, dc3inc, dc2inc, hdc2, sc4 (22)
4. sc, sc3inc, sc9, sc2inc x 3, sc8 (27)
5. sc27 around in back loop only (27)
6. sc27 around in both loops (27)
7. sc13, sc2tog x 4, sc6 (23)
8. slst x 13, sc2tog x 2, slst x 6 (21)
Fasten off. Optionally you can add straps.
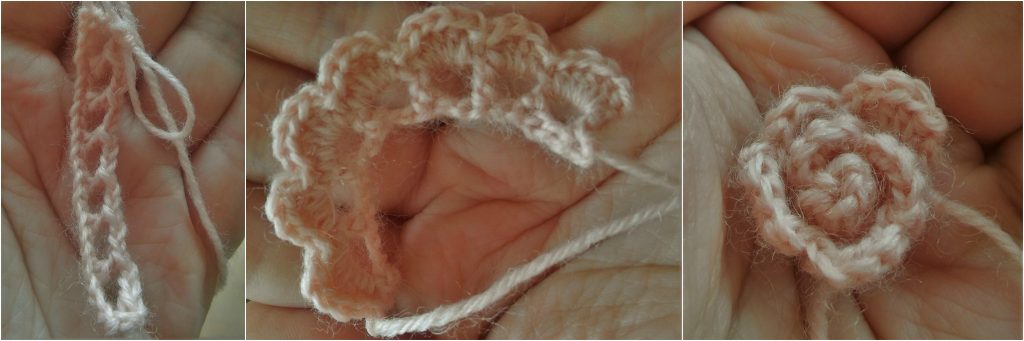
– The Flower Crown
Use 1,5mm hook or larger, depends on what size flowers you want to get. Make as many flowers as you want, I made 8 flowers and 4 leaves. First make the base for the flowers. Use the same yarn you used for the hair. Chain approximately 30 chains, in 4th chain from hook dc1 and dc in every chain you made. Fasten off. On each side of the base attach yarn with which you’ll tie the base around the head.

The Rose:
1.ch25
2. dc1 in 4th chain from hook, (ch2, skip 2 chains, dc) x 7, ch1 and turn (22) 3. [in 2 chain space make (hdc, dc3, hdc), in dc stitch slst] x 7 (42)
Fasten off and leave a tail for tying the flower to the base.
The Leaf:
1. ch6
2. in 2nd chain from hook sc1, sc1, hdc, dc, hdc3inc, continue around, dc, hdc, sc2, slst.
Fasten off.
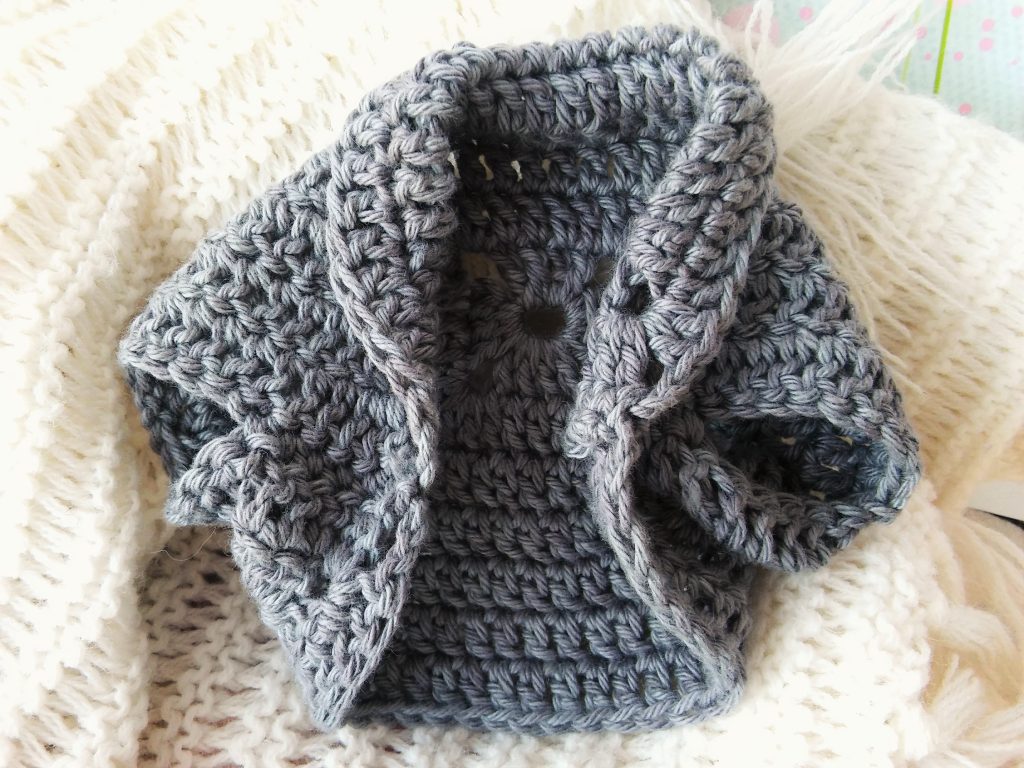
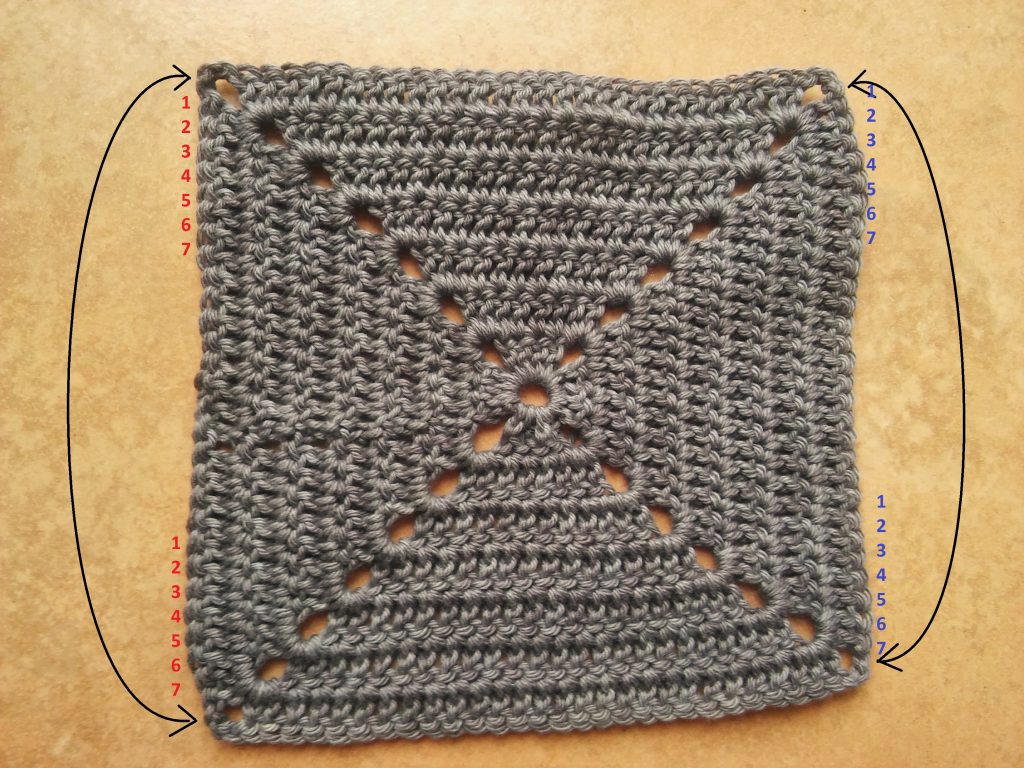
– The Granny Square Cardigan
- ML
- sc and ch3 (this will stand for 1st dc), dc3, ch3, (dc4, ch3) x 3, join with slip stitch in the top chain of the ch3 (28)
- ch4, dc3, [in 3 chain space make (dc2, ch3, dc2)], [dc4, in 3 chain space make (dc2, ch3, dc2)] x 3, slst in the top chain of the ch4. (44)
- ch4, dc5, [in 3 chain space make (dc2, ch3, dc2)], [dc8, in 3 chain space make (dc2, ch3, dc2)] x 3, dc2, slst in the top chain of the ch4. (60)
- ch4, dc7, [in 3 chain space make (dc2, ch3, dc2)], [dc12, in 3 chain space make (dc2, ch3, dc2)] x 3, dc4, slst in the top chain of the ch4. (76)
- ch4, dc9, [in 3 chain space make (dc2, ch3, dc2)], [dc16, in 3 chain space make (dc2, ch3, dc2)] x 3, dc6, slst in the top chain of the ch4. (92)
- ch4, dc11, [in 3 chain space make (dc2, ch3, dc2)], [dc20, in 3 chain space make (dc2, ch3, dc2)] x 3, dc8, slst in the top chain of the ch4. (108)
- ch4, dc13, [in 3 chain space make (dc2, ch3, dc2)], [dc24, in 3 chain space make (dc2, ch3, dc2)] x 3, dc10, slst in the top chain of the ch4. (124)
Fasten off. Join as shown in picture. Crochet or sew top ch3 and bottom ch3 together and continue joining the next 7 stitches on each side.
– The Pants
1.ch36
2. Join in the round by making one sc in the first chain, make one sc in each chain (36)
3. – 6. sc36 around (36)
7. sc8, sc2inc, sc17, sc2inc, sc9 (38)
8. sc9, sc2inc, sc17, sc2inc, sc10 (40)
9. sc9, sc2inc, sc19, sc2inc, sc10 (42)
10. – 11. sc42 around (42)
12. sc10, sc2inc, sc20, sc2inc, sc10 (44)
13. – 14. sc44 around (44)
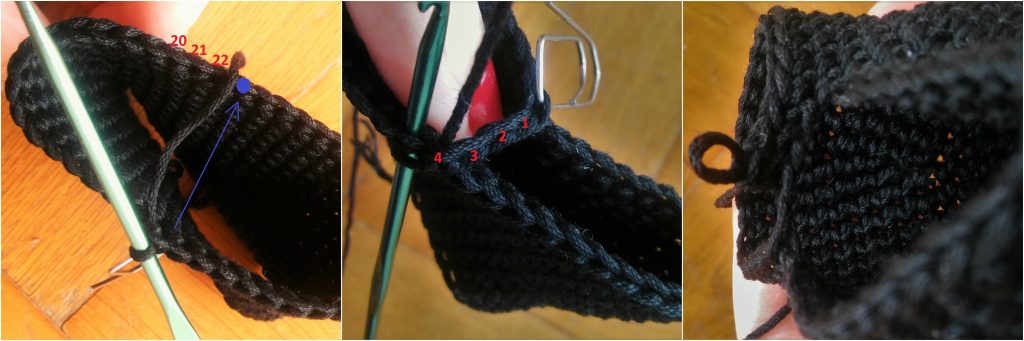
15.ch4, skip 22, sc1 in the stitch marked with blue dot, make sure to insert your hook from the outside, continue making sc21 (26)
16. sc1 in each chain = sc4, sc22 (26)
17. sc26 around (26) – Fasten off.
Make the other leg the same way. Attach yarn in the 22nd stitch you skipped, chain 4, sc1 in the opposite stitch. Repeat instructions from 16th and 17th row. Close the hole between by sewing it.
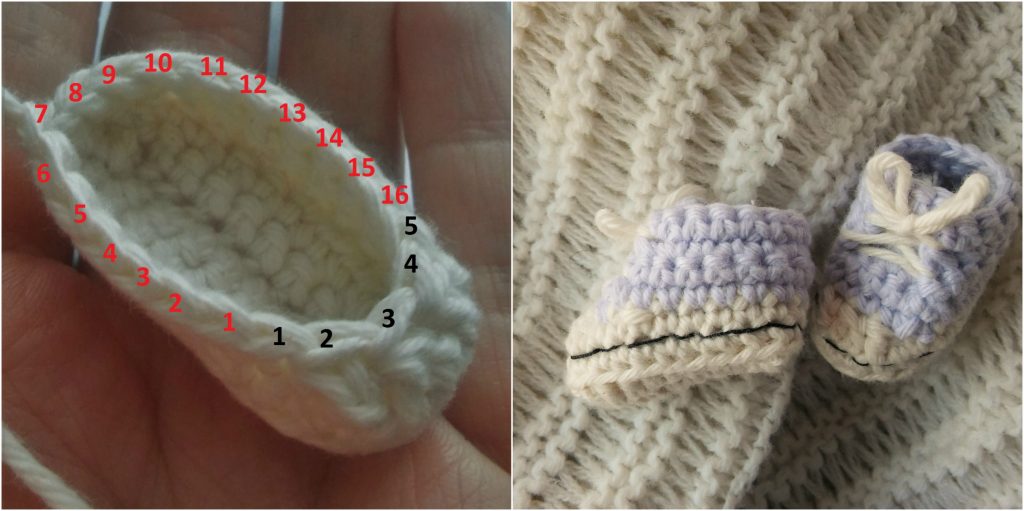
– The Sneakers
Work in oval.
1.ch9
2. in 2nd chain from hook sc2inc, sc6, sc3inc, continue around, sc7 (the last sc in same chain as sc2inc you made at the beginning of 2nd row) (18)
3. sc, sc2inc, sc4, hdc2, dc2inc, dc3inc, dc2inc, hdc2, sc4, sc2inc (24)
4. sc24 in back loop only (24)
5. sc10, dc2tog x 3, sc8 (21)
The Tongue:
Attach yarn in stitch marked with black number 1 shown in picture.
1.sc in the same stitch, sc4 more, ch1 and turn
2. – 5. sc5, ch1 and turn,
6. sc4, slst – Fasten off.
The Quarter:
Attach yarn in stitch marked with red number 1 shown in picture.
1.sc1 in the same stitch, sc15 more, ch1 and turn
2. sc16, ch1 and turn,
3. sc2tog, sc12, sc2tog, ch1 and turn
4. sc13, slst
Fasten off. Insert shoelaces and embroider thin black line between last two rows of the sole.
That’s it!
If you have any questions or comments, feel free to contact me in comments section of this post, on my Facebook page, or by email themagicloop.com@gmail.com. Also, if you make this crochet doll, send me some pictures, I’ll publish them on my Facebook page. You can tag me on Instagram @themagicloop.
You can support me by sharing this post or by buying my other patterns on Etsy or Ravelry.
This pattern is copyright of Barbara Peček / TheMagicLoop.com . Please do not claim this pattern as your own. If you wish to share this pattern, you may link to this pattern but please do not reprint it on your site. Do not sell this pattern or parts of this pattern. You may sell finished items made from this pattern, but please clearly credit the design to me and provide a link to my website www.themagicloop.com.

5 Comments
😮 <3 ty!!
On the doll clothes “Granny Square Cardigan” the 1st Row says ML. What does ML mean?
magic loop
On the granny square cardigan, do you have dimension of the square?